
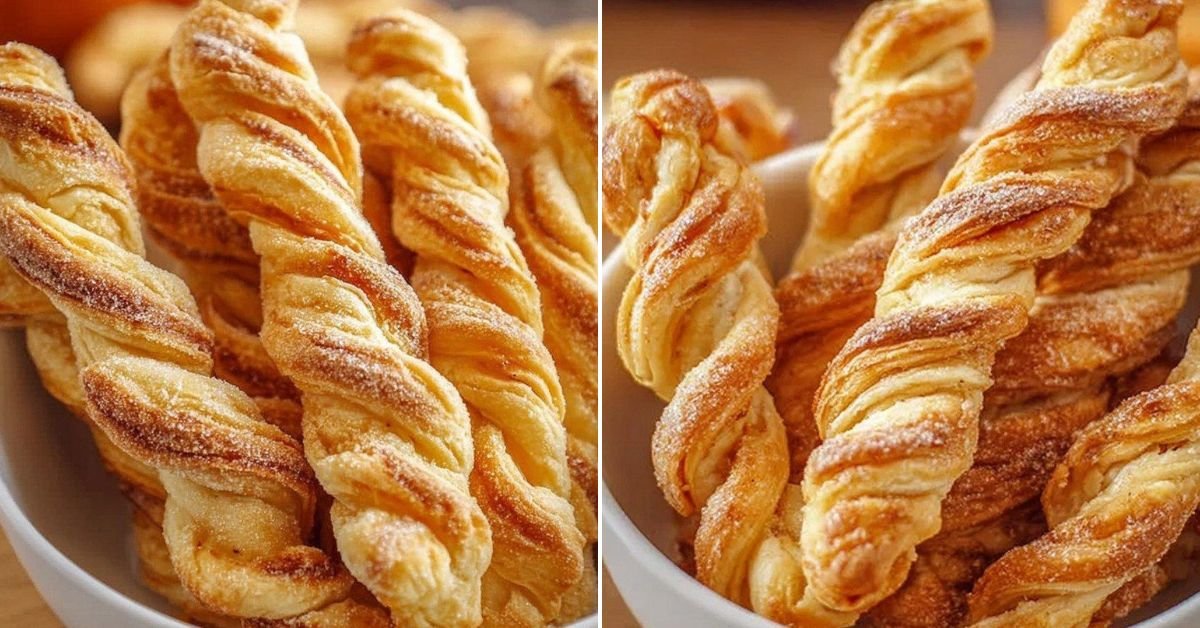
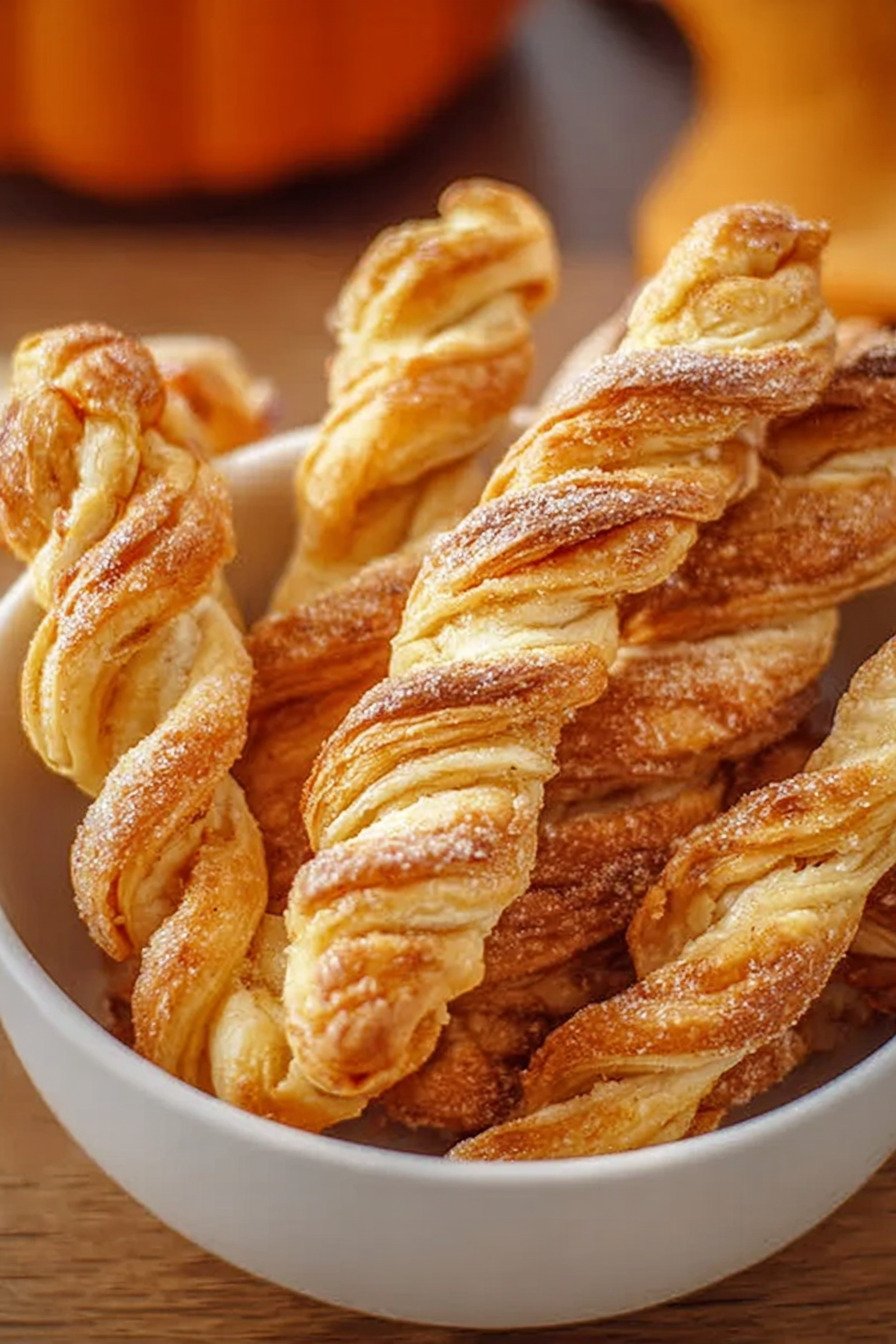
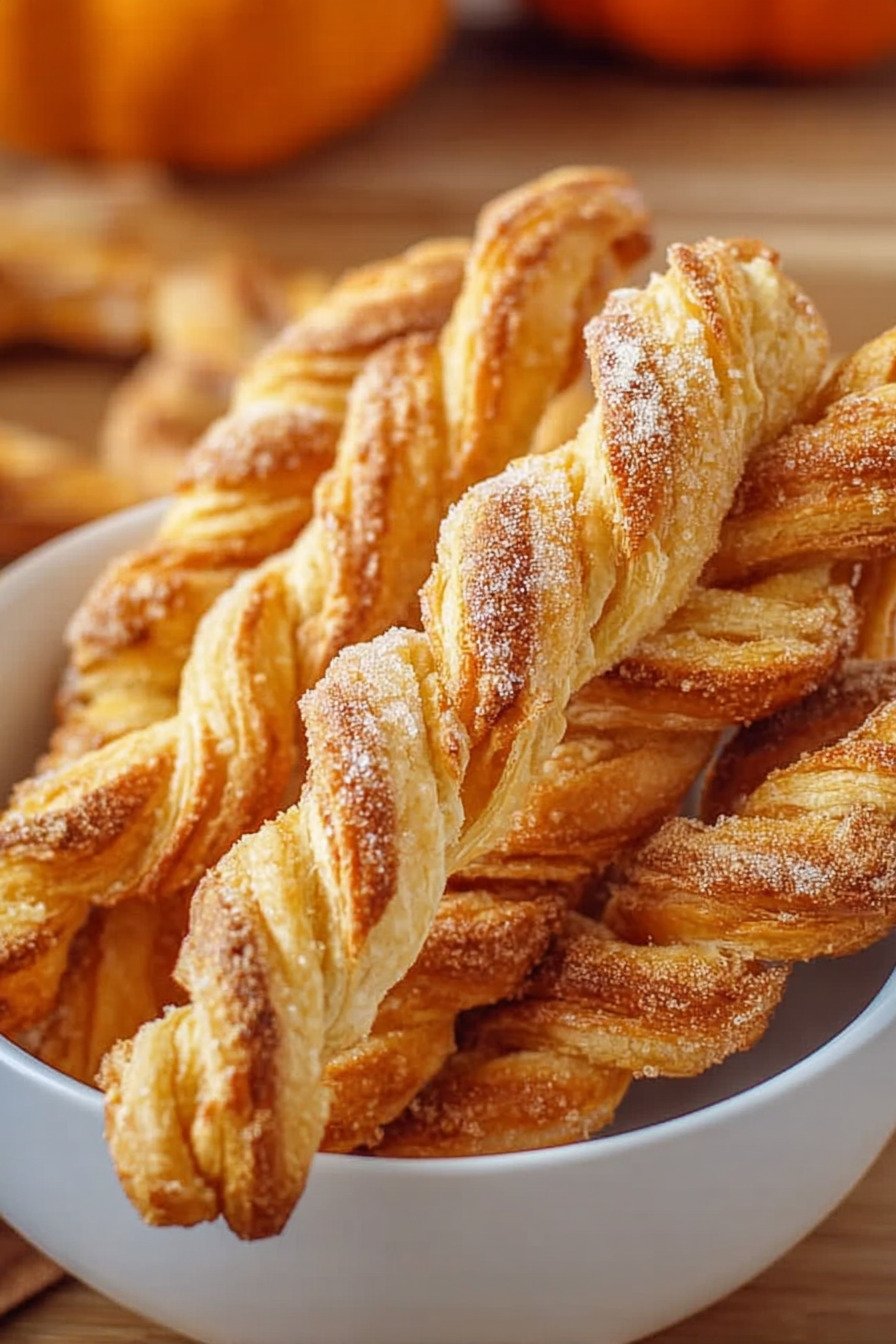
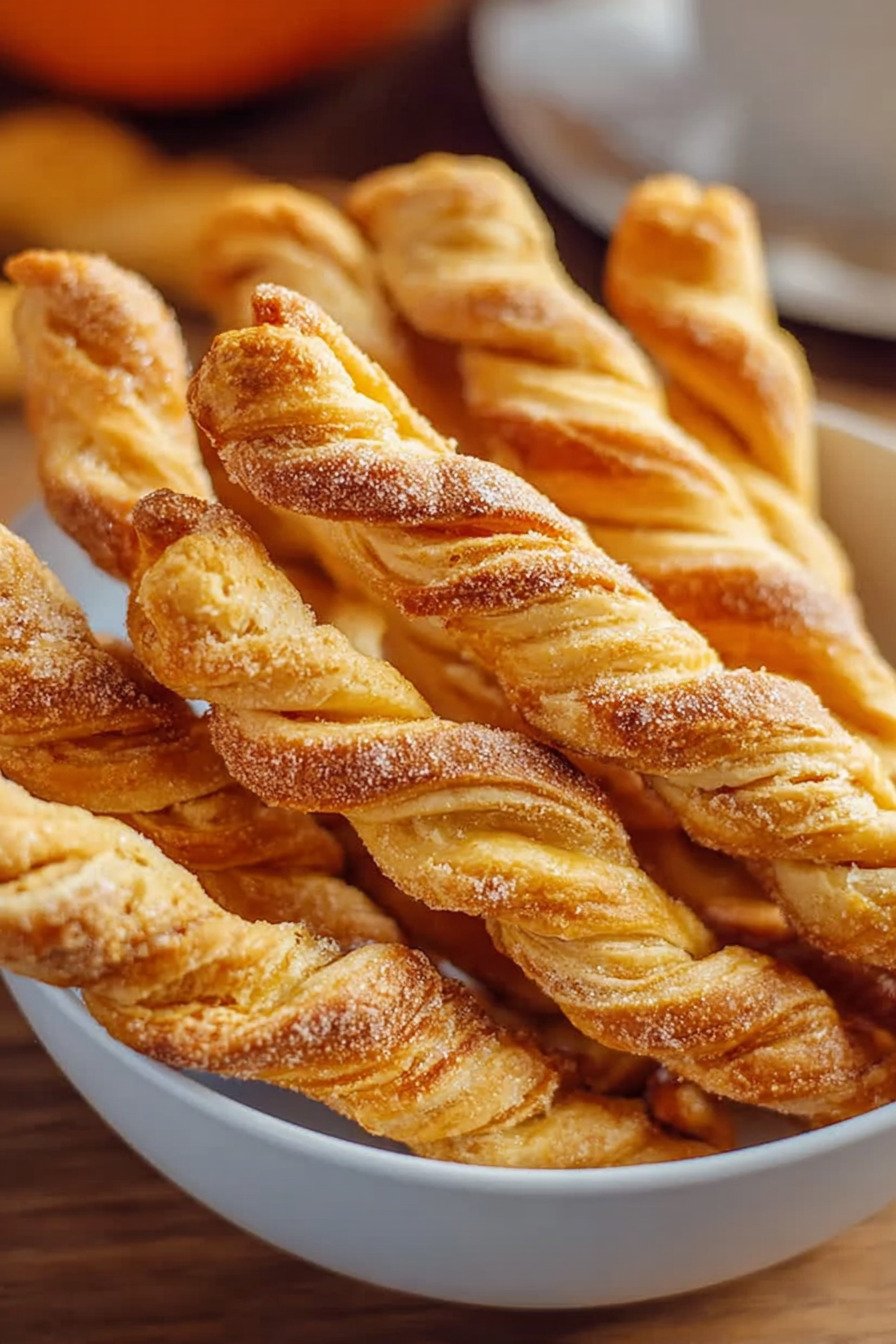
You know that feeling when fall hits and suddenly you’re craving all things pumpkin? Yeah, me too. I’ve been making these pumpkin pie twists for years now, and they’re one of those recipes I keep coming back to. They’re basically everything I love about a good pumpkin pie recipe, but way easier and honestly more fun to eat. What makes this simple pumpkin pie recipe so great is you don’t need fancy skills or hours of prep. We’re talking crescent dough, some pumpkin filling with maple syrup, a little cinnamon sugar action, and boom… you’ve got yourself a treat. I first stumbled on this fresh pumpkin pie recipe idea when I had leftover pumpkin puree and was too lazy to make a whole pie. Best lazy decision ever. These twists work for pretty much any occasion. Thanksgiving? Check. Random Tuesday when you need something sweet? Absolutely. And if you’re looking for recipes with pumpkin that won’t take all day, this is your answer. Some folks even make a vegan pumpkin pie version by swapping the butter for plant-based stuff. I’ve tried it with a healthy pumpkin pie recipe spin too, using less sugar, and it still tastes amazing. My favorite part is watching them turn golden in the oven, that butter and cinnamon smell filling the kitchen. Trust me, once you try this pumpkin pie recipe with real pumpkin, you’ll get why I make them all season long.
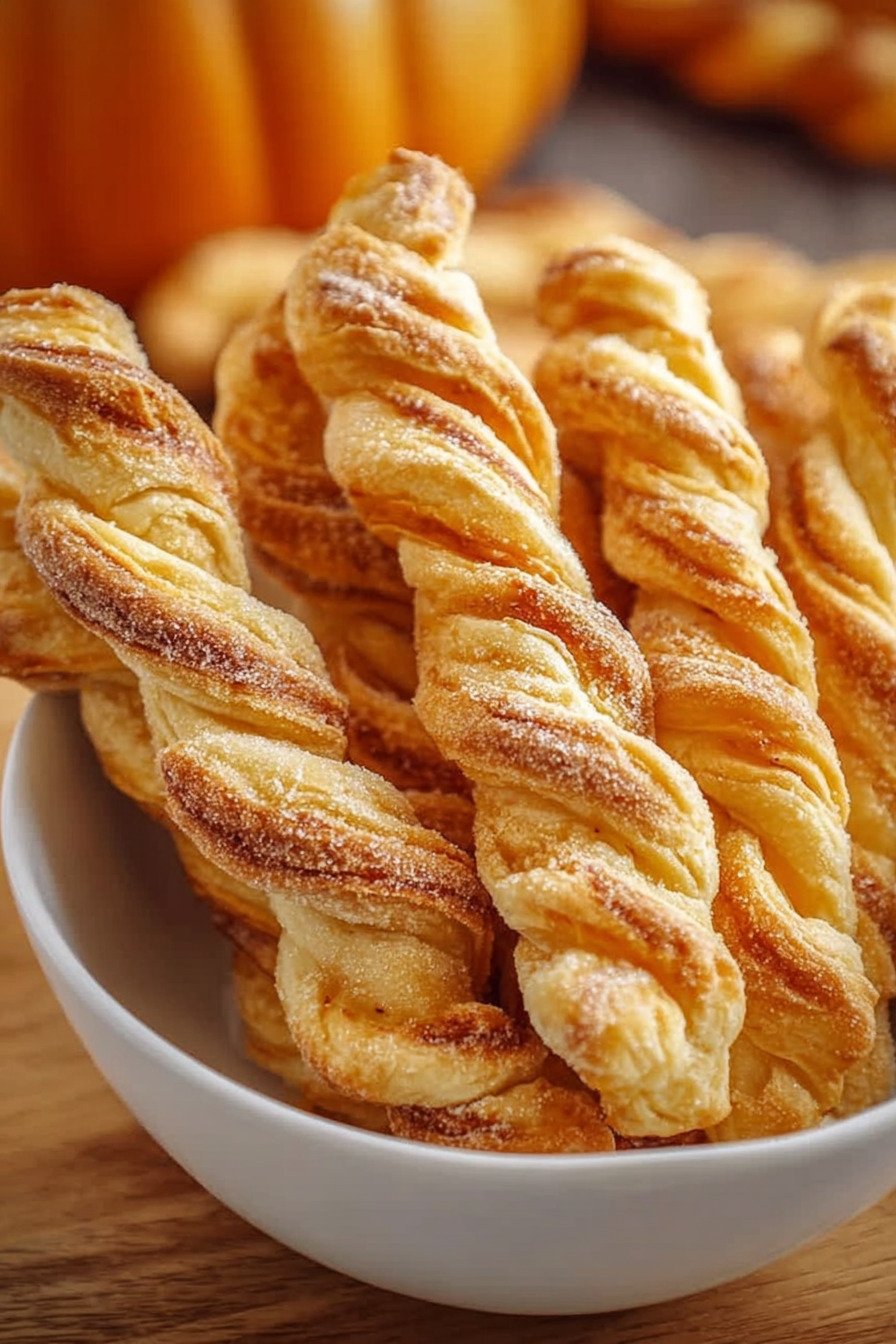
Table of Contents
- 1) Key Takeaways
- 2) Easy Pumpkin Pie Twists Recipe
- 3) Ingredients for Pumpkin Pie Twists
- 4) How to Make Pumpkin Pie Twists
- 5) Tips for Making Pumpkin Pie Twists
- 6) Making Pumpkin Pie Twists Ahead of Time
- 7) Storing Leftover Pumpkin Pie Twists
- 8) Try these Desserts next!
- 9) Pumpkin Pie Twists
- 10) Nutrition
1) Key Takeaways
- What makes pumpkin pie twists different from regular pumpkin pie?
- Can you make pumpkin pie twists with store bought dough?
- How do you keep pumpkin twists from getting soggy?
- What’s the secret to getting perfectly twisted pastries?
2) Easy Pumpkin Pie Twists Recipe
I’m Linda from Cook Daily Recipe, and I gotta tell you, these pumpkin pie twists have been my go to fall dessert for years now. When autumn rolls around and everyone starts posting their elaborate pumpkin pie recipe creations, I’m over here making these simple beauties in about 20 minutes flat. No joke.
What I love most about this pumpkin pie recipe is how it takes all those classic flavors we crave and puts them in this fun, handheld form. You get that warm pumpkin spice, the buttery flakiness, and that little hint of maple syrup that makes everything taste like fall should taste. My sister calls them “lazy pumpkin pie” but honestly, smart is more like it. Why spend hours crimping pie crusts when you can twist some crescent dough and call it a day?
Quick. Seriously, from start to finish, you’re looking at 20 minutes. That includes prep and baking time. I’ve made these when unexpected guests showed up, and they thought I’d been baking all afternoon. The secret? Crescent roll dough. It’s the MVP of this pumpkin pie recipe. Just unroll it, fill it, twist it, and you’re golden. Literally.
Easy. If you can spread peanut butter on bread, you can make these. The technique is super forgiving. Your twists don’t have to be perfect Instagram worthy swirls. Mine never are. Some are tight, some are loose, some barely qualify as twisted. They all taste amazing. That’s what matters. You’re not auditioning for a baking show here. You’re making dessert.
Delicious. The pumpkin filling gets this caramelized edge where it meets the hot dough. The cinnamon sugar on top creates this sweet, slightly crunchy coating. And that butter? It makes everything golden and rich. I’ve seen people who swear they don’t like pumpkin desserts go back for thirds. The maple syrup adds this depth that you can’t quite put your finger on, but you know something special is happening.
Versatile. Want a vegan pumpkin pie version? Swap the butter for plant based margarine. Need a healthier option? Use less sugar in the filling. Got leftover sweet potato puree? That works too. I’ve made these a hundred different ways, and they always turn out great. That’s the beauty of a good simple pumpkin pie recipe. It adapts to whatever you’ve got going on in your kitchen.
3) Ingredients for Pumpkin Pie Twists
Crescent Roll Dough. This is your foundation, your canvas, your best friend in this recipe. I always keep a tube or two in my fridge during fall. The pre made stuff works perfectly and saves you from making dough from scratch. Some people get all purist about homemade dough, and that’s fine, but I’m here to get dessert on the table, not win awards. The texture is already flaky and buttery, which pairs beautifully with the pumpkin filling. Just make sure it’s cold when you work with it. Room temperature dough gets sticky and annoying real fast.
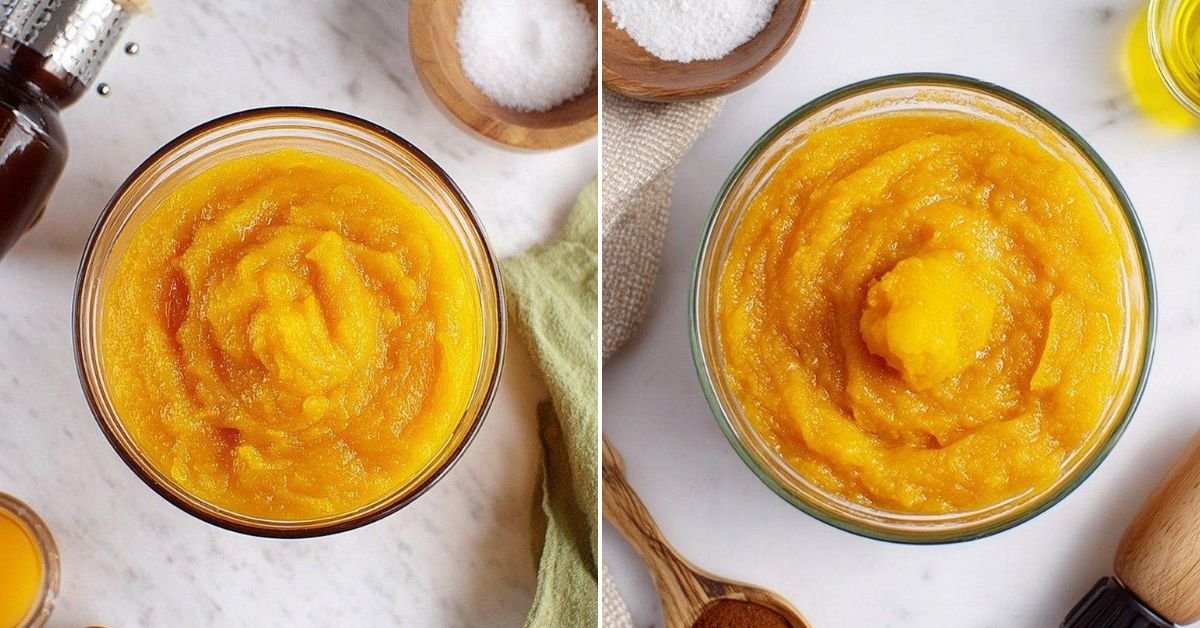
Pumpkin Puree. The star of any pumpkin pie recipe with real pumpkin. I use canned most of the time, and I’m not ashamed to admit it. It’s consistent, it’s convenient, and it tastes great. Make sure you grab pure pumpkin puree, not pumpkin pie filling. That stuff already has sugar and spices, which throws off the balance. If you’ve got fresh pumpkin and want to roast it yourself, go for it. I did that once. It was a whole thing. The canned stuff is just as good, trust me. You want that smooth, creamy texture that blends easily with the other ingredients.
Brown Sugar. White sugar would work, but brown sugar brings something special to this fresh pumpkin pie recipe. That molasses content adds depth and a slight caramel flavor that complements the pumpkin beautifully. I use light brown sugar, but dark works too if you want a richer taste. Don’t pack it too tight when you measure it. Just scoop and level. We’re not trying to create pumpkin cement here. The sugar dissolves into the puree and creates this sweet, smooth filling that’s not too cloying.
Maple Syrup. Here’s where this recipe gets interesting. A lot of people skip this, but I’m telling you, don’t. The maple syrup adds this warm, almost woody sweetness that takes these twists from good to “can I have the recipe?” good. You don’t need fancy Grade A fancy stuff. I use whatever’s in my pantry. Even the grocery store brand works fine. Just a tablespoon transforms the filling. It brings out the autumn vibes and makes everything taste more complex without being able to pinpoint exactly why.
Pumpkin Spice. You can make your own blend of cinnamon, nutmeg, ginger, and cloves, or you can buy the pre mixed stuff. I’ve done both. The pre mixed is faster, and honestly, I can’t tell the difference once these are baked. This is what gives your pumpkin pie recipe that signature fall flavor. That warm, cozy, makes you want to wrap yourself in a blanket kind of taste. Don’t skimp on this. A full teaspoon is what you need to really taste it.
Melted Butter. This gets brushed on top before baking and is what gives these twists that gorgeous golden color. I melt mine in the microwave for about 20 seconds. Easy. The butter also adds flavor and helps that cinnamon sugar stick to the surface. Some recipes call for an egg wash, but I find butter works better for these. It makes them richer and more indulgent. You want to be generous with it. Don’t just lightly dab. Really brush it on there.
Granulated Sugar. This gets mixed with cinnamon and sprinkled on top. It creates a slightly crunchy, sweet coating that contrasts nicely with the soft, flaky dough. You don’t need much. Just a tablespoon. Too much and it gets gritty. Too little and you lose that textural element. It’s all about balance. When it bakes, it caramelizes slightly and adds this extra layer of deliciousness.
Ground Cinnamon. Mixed with the sugar for topping, this adds another hit of that warm spice flavor. Cinnamon is kind of the unofficial mascot of fall baking, right? It makes your kitchen smell incredible while these bake. That alone is worth making this recipe. Half a teaspoon is plenty. Any more and it starts tasting medicinal. Any less and you barely notice it. We want that sweet spot where you can taste it but it’s not overwhelming.
Whipped Cream. This is totally optional, but come on. Why wouldn’t you? I serve these with a bowl of whipped cream for dipping. Some people like Cool Whip. I prefer the real stuff, lightly sweetened with a splash of vanilla. It adds this cool, creamy contrast to the warm, spiced twists. If you’re feeling extra, you could do a maple whipped cream. Just add a little maple syrup to your whipped cream. Game changer.
4) How to Make Pumpkin Pie Twists
Step 1. Get your oven heated to 375°F and line a baking sheet with parchment paper. I cannot stress the parchment paper enough. I learned this the hard way after scraping stuck on dough off a pan for 20 minutes. Just use the paper. Your future self will thank you. The oven needs to be fully preheated before you put these in, or they won’t bake evenly. That’s when you get some twists that are perfectly golden and others that are still pale and doughy. Set a timer so you don’t forget about them while you’re prepping.
Step 2. In a small bowl, combine your pumpkin puree, brown sugar, maple syrup, and pumpkin spice. Stir it all together until it’s smooth and completely mixed. You want that sugar dissolved so you don’t get grainy spots in your filling. This takes maybe a minute. Don’t rush it. Make sure everything is evenly distributed. The mixture should be thick but spreadable. If it’s too thick, you can add a tiny splash of milk. If it’s too thin, well, that’s a problem. But it shouldn’t be if you measured right.
Step 3. Unroll your crescent dough on a cutting board. Here’s where people get confused. You’re not separating it into triangles like you normally would. Instead, cut the dough in half to create two rectangles. Just one clean cut down the middle. Press the seams together if your dough has perforations. You want solid rectangles, not a bunch of separate pieces. Keep these pieces on your cutting board. You’ll be working with them right there.
Step 4. Spread your pumpkin mixture all over one rectangle. Use a spoon or a spatula and spread it evenly, leaving about a quarter inch border around the edges. This border is important. It keeps the filling from squishing out when you press the dough together. Don’t pile it all in the center and call it good. Even distribution means every bite gets that pumpkin flavor. Once it’s spread, take your second rectangle and lay it on top like you’re making a sandwich. Press the edges together gently to seal.
Step 5. Now grab a pizza cutter or a sharp knife and cut the dough into strips. Aim for about three quarters of an inch wide. They don’t have to be perfect. Mine never are. I usually end up with 10 to 12 strips depending on how wide I cut them. The key is to make them relatively similar so they bake evenly. If one is super skinny and one is really thick, they’ll cook at different rates. That’s when you get burned edges and raw middles. Not ideal.
Step 6. This is the fun part. Pick up one strip and twist it. Grab one end and twist it twice, then grab the other end and twist it a few more times. The more you twist, the prettier they look. But even if yours look wonky, they’ll taste the same. I promise. I’ve made some truly ugly twists that were absolutely delicious. Don’t stress about making them perfect. Just twist them up and move on to the next one. You’ll get into a rhythm.
Step 7. Place each twisted strip on your prepared baking sheet, leaving a bit of space between them. They’ll puff up slightly as they bake, so don’t crowd them. Once they’re all on the sheet, brush them generously with melted butter. And I mean generously. Don’t be shy. This is what makes them golden and delicious. Use a pastry brush if you have one, or just drizzle it on and spread it with the back of a spoon. Make sure every surface gets coated.
Step 8. Mix your sugar and cinnamon together in a small bowl. I usually do this in whatever bowl I used for the pumpkin mixture after I’ve rinsed it out. Less dishes. Then sprinkle this mixture all over the buttered twists. You want a nice even coating. This creates that sweet, spiced crust on top. Tap the bowl with your finger to get a nice even sprinkle. Don’t just dump it all in one spot. That’s amateur hour.
Step 9. Pop that baking sheet in your preheated oven and bake for 8 to 11 minutes. Keep an eye on them, especially around the 8 minute mark. Every oven is different. Mine runs hot, so 8 minutes is usually perfect. My mom’s oven is slow, so she needs the full 11. You want them golden brown with slightly darker edges. When you pull them out, they might seem a little soft. That’s fine. They’ll firm up as they cool. Let them sit on the pan for a few minutes before moving them.
Step 10. Let these cool for just a few minutes, then serve them warm. This is when they’re at their absolute best. The dough is still slightly crispy, the filling is warm and fragrant, and that butter and cinnamon sugar coating is just perfect. If you made whipped cream, now’s the time to bring it out. Set up a little dipping station. People love that. I usually arrange these on a platter and watch them disappear within minutes.
5) Tips for Making Pumpkin Pie Twists
Keep Your Dough Cold. This is maybe the most important tip I can give you for any recipes with pumpkin using pastry dough. Cold dough is easier to work with and bakes up flakier. If your kitchen is warm and the dough starts getting soft and sticky while you’re working, pop it in the fridge for five minutes. Seriously. It makes a huge difference. Warm dough tears easily and doesn’t twist as nicely. I learned this after many frustrating attempts at making pastries in my un air conditioned kitchen in August. Not recommended.
Don’t Overfill. I know it’s tempting to pile on extra pumpkin filling. More is better, right? Wrong. Too much filling and it squishes out everywhere when you try to seal and twist the dough. You end up with a mess. A delicious mess, but still a mess. Stick to the half cup. It’s enough to give you that pumpkin flavor in every bite without causing structural issues. If you have leftover filling, eat it with a spoon. I won’t tell anyone.
Press the Edges Well. When you put that second rectangle of dough on top of the filling, really press those edges together. This seals in all that good stuff. If you don’t press well, the filling leaks out during baking and you lose some of that flavor. Plus it makes a mess on your pan. I press with my fingers first, then go over it again with the tines of a fork. That really locks it down. It takes an extra 30 seconds and saves you grief later.
Use a Pizza Cutter. I mentioned this earlier, but it bears repeating. A pizza cutter makes slicing these strips so much easier than a knife. It rolls right through the dough cleanly without dragging or tearing. You get nice, even strips every time. If you don’t have a pizza cutter, a very sharp knife works, but you have to use a clean cutting motion. Don’t saw back and forth. That tears the dough and makes your edges messy.
Twist Tightly. The tighter you twist these strips, the better they hold their shape during baking. Loose twists tend to unravel slightly and lose that pretty spiral effect. Pick up each strip and really give it a good twist. Two or three full rotations on each end. They should feel snug. You’re not going to break them. The dough is pretty forgiving. Just twist with confidence. Your twists will look more professional and hold together better.
Brush Butter Everywhere. Don’t just hit the tops. Get the sides too if you can. The more surface area you coat with butter, the more golden and delicious your twists will be. I sometimes tip each twist on its side and brush the sides before laying it flat again. It’s a little extra work, but the payoff is worth it. Those buttery, golden edges are what make people think you spent way more time on these than you actually did.
Watch the Oven. These bake fast. Like, turn your back for two minutes and they’re overdone fast. Set a timer for 8 minutes and check them. You want golden brown, not dark brown. They go from perfect to burnt quickly at the end. If your oven has hot spots, rotate the pan halfway through baking. This gives you even coloring on all the twists. Nobody wants some that are perfect and others that are too dark.
6) Making Pumpkin Pie Twists Ahead of Time
Here’s something I figured out after making this healthy pumpkin pie recipe variation for the third Thanksgiving in a row. You can prep almost everything ahead of time. The filling keeps in the fridge for up to three days. Just make it, cover it, and store it. When you’re ready to bake, it’s right there waiting for you. This is clutch when you’re trying to juggle multiple dishes. Less stress, same delicious result.
You can actually assemble these twists completely and freeze them unbaked. I lay them on a parchment lined baking sheet, freeze them until solid, then transfer them to a freezer bag. They keep for about a month. When you want to bake them, you don’t even need to thaw them. Just brush with butter, sprinkle with cinnamon sugar, and add a couple extra minutes to the baking time. Boom. Fresh baked twists whenever you want them. Game changer for holiday entertaining.
If you want to bake them ahead and reheat, that works too. Bake them as directed, let them cool completely, then store them in an airtight container. When you’re ready to serve, warm them in a 300°F oven for about 5 minutes. They won’t be quite as crispy as fresh from the oven, but they’re still really good. Way better than serving them at room temperature. That little bit of warmth makes all the difference.
The one thing I don’t recommend is making the dough from scratch ahead of time. Just buy the crescent rolls when you need them. They’re designed to be used fresh and they don’t keep well once opened. Plus they’re cheap and convenient. Save your energy for things that actually matter. This simple pumpkin pie recipe is all about making your life easier, not harder. Work smarter, not harder, right?
7) Storing Leftover Pumpkin Pie Twists
Let’s be real. There probably won’t be leftovers. These things disappear fast. But on the off chance you have some, here’s what you do. Let them cool completely first. Putting warm pastries in a container creates condensation, which makes them soggy. Nobody wants soggy pumpkin pie twists. Once they’re cool, transfer them to an airtight container. They’ll keep at room temperature for about two days.
If you want them to last longer, stick them in the fridge. They’ll keep for up to five days in there. The texture changes a bit. They get softer and lose some of that initial crispness. But you can bring that back. Just pop them in a 300°F oven for a few minutes before serving. They’ll crisp right back up. I do this all the time. It’s like having fresh baked twists again without all the work.
You can freeze baked twists too. Wrap them individually in plastic wrap, then put them all in a freezer bag. They’ll keep for up to two months. Thaw them in the fridge overnight, then reheat in the oven. They won’t be exactly like fresh, but they’re still pretty darn good. I’ve done this for meal prep before. Having a homemade treat ready to grab from the freezer is clutch when you need something sweet fast.
Here’s a pro tip I learned from my grandma. If your twists have gotten a bit stale, brush them with a little melted butter and sprinkle with fresh cinnamon sugar, then warm them up. It’s like giving them a second life. The new butter and sugar coating makes them taste fresh again. Obviously they’re best eaten right after baking, but this trick works in a pinch. Waste not, want not, as she always said.
8) Try these Desserts next!

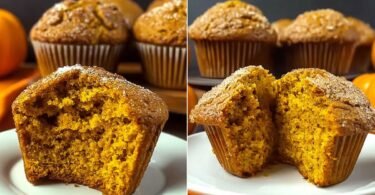
9) Pumpkin Pie Twists

Pumpkin Pie Recipe Twists: Easy Fall Treat
Ingredients
- 1 tube of refrigerated crescent roll dough
- 1/2 cup of pumpkin puree
- 1/4 cup of brown sugar
- 1 tablespoon of maple syrup
- 1 teaspoon of pumpkin spice
- 2 tablespoons of melted butter
- 1 tablespoon of sugar
- 1/2 teaspoon of cinnamon
- Whipped cream (optional, for dipping)
Instructions
- Get your oven going at 375°F and line a baking sheet with parchment paper. This keeps everything from sticking and makes cleanup way easier.
- Grab a small bowl and mix together your pumpkin puree, brown sugar, maple syrup, and pumpkin spice. Stir it up until it’s smooth and everything’s combined nicely.
- Roll out that crescent dough on a cutting board and cut it in half so you’ve got two rectangles sitting side by side.
- Spread your pumpkin mixture all over one of those rectangles. Leave a tiny border around the edges, then slap the other rectangle on top like you’re making a sandwich.
- Take a pizza cutter or sharp knife and slice the whole thing into strips about 3/4 inch wide. Try to keep them pretty even so they bake at the same rate.
- Now comes the fun part. Pick up each strip and twist it a couple times on one end, then twist the other end a few more times. The more twists, the better they look when they’re done.
- Lay each twist on your baking sheet with some space between them. Brush melted butter all over each one, being generous with it.
- Mix your sugar and cinnamon in a little bowl and sprinkle it over all the twists. This creates that sweet, slightly crunchy topping we’re after.
- Pop them in the oven for 8 to 11 minutes. Keep an eye on them because ovens vary, but you want them golden brown and crispy on the outside.
- Let them cool for a few minutes before serving. If you want to get fancy, serve with whipped cream for dipping. They’re honestly amazing either way.
10) Nutrition
Serving Size: 1 twist, Calories: 142, Sugar: 6.8 g, Sodium: 198 mg, Fat: 7.2 g, Saturated Fat: 2.8 g, Carbohydrates: 17.4 g, Fiber: 0.8 g, Protein: 2.1 g, Cholesterol: 6.1 mg


Leave a Comment