
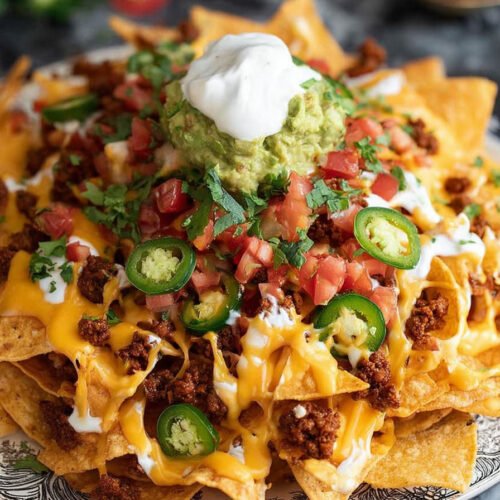
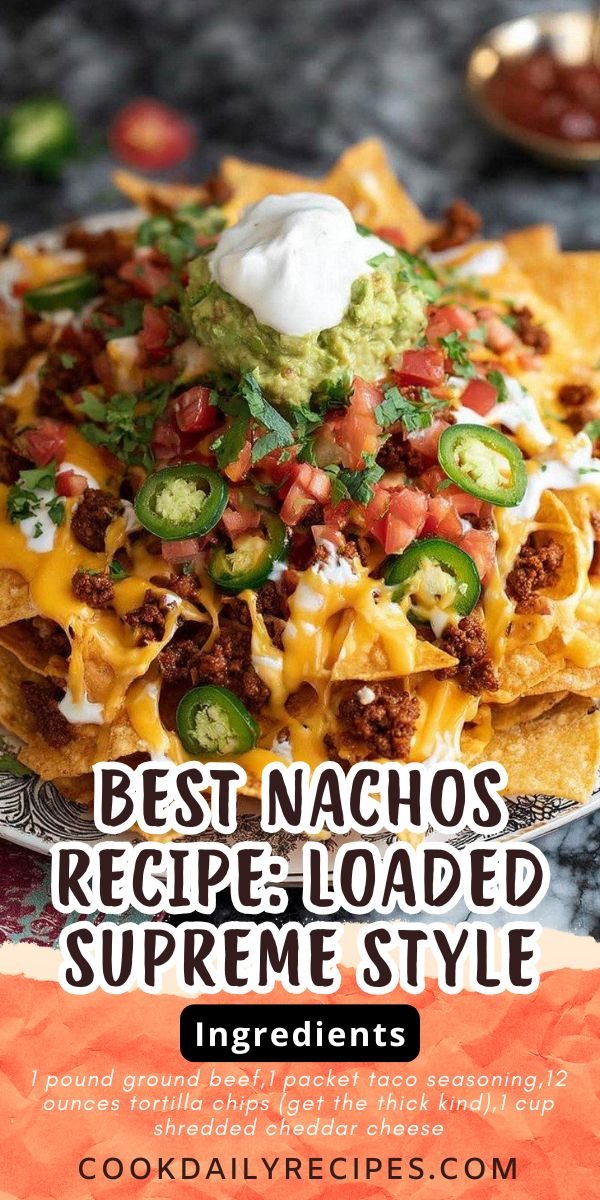
Let me tell you about the time I threw together these nachos for game night and literally couldn’t get anyone to leave my kitchen. We’re talking about chips loaded with seasoned beef, melted cheese that stretches for days, and all the fresh toppings you can imagine. I’ve tested out what feels like a million nachos recipe variations over the years, from loaded nachos recipe beef to nachos recipe vegetarian, and this one hits every single time. What makes this nachos supreme recipe different? You get layers of flavor in every bite. We’re building from the bottom up with sturdy chips, perfectly seasoned beef nachos recipe style meat, and enough cheese to make your heart sing. Top it all with fresh jalapeños, cool sour cream, creamy guacamole, and bright salsa. This best nachos recipe comes together fast, feeds a crowd, and you can easily swap in black beans to make a healthy nachos recipe version. Trust me, once you make these at home, you’ll never order nachos out again. They’re that good.

Table of Contents
- 1) Key Takeaways
- 2) Easy Loaded Nachos Supreme Recipe
- 3) Ingredients for Loaded Nachos Supreme
- 4) How to Make Loaded Nachos Supreme
- 5) Tips for Making Loaded Nachos Supreme
- 6) Making Loaded Nachos Supreme Ahead of Time
- 7) Storing Leftover Loaded Nachos Supreme
- 8) Try these Appetizers next!
- 9) Loaded Nachos Supreme
- 10) Nutrition
1) Key Takeaways
- What makes the best nachos recipe stand out from regular chips and cheese?
- Can you turn a loaded nachos recipe beef version into something vegetarian?
- What’s the secret to keeping nachos crispy instead of soggy?
- How do you build layers for a proper nachos supreme recipe?
2) Easy Loaded Nachos Supreme Recipe
I’ve been making this nachos recipe for years, and it never gets old. We’re talking about the kind of snack that brings people running to the kitchen when they smell that cheese melting in the oven. This loaded nachos recipe beef style comes together so fast you’ll wonder why you ever ordered nachos at a restaurant.
The beauty of this nachos supreme recipe is how flexible it becomes once you master the basics. Got friends coming over who don’t eat meat? Swap the beef for black beans and you’ve got yourself a nachos recipe vegetarian that tastes just as good. I do this all the time when my sister visits, and she can’t tell the difference once all those toppings pile on.
What really sets this beef nachos recipe apart is the layering technique. You can’t just dump everything on top and hope for the best. We build flavor from the bottom up, making sure every chip gets its fair share of toppings. The result? A healthy nachos recipe that doesn’t skimp on taste but gives you room to add veggies and lighter options if that’s your thing.
Speed matters when you’re hungry, right? This best nachos recipe takes about 25 minutes from start to finish. That includes browning the meat, layering everything, and baking until the cheese gets all bubbly and golden. Most of that time is hands off, which means you can mix up some margaritas or set the table while the oven does its thing.
Here’s what makes these nachos so easy to love. You start with ingredients most of us already have sitting around. Ground beef, cheese, chips, maybe some jalapeños if you like heat. The rest is just assembly work. No fancy techniques, no complicated steps. Just good food that makes people happy.
The cheese situation deserves its own paragraph. We’re using both cheddar and Monterey Jack here, and that combo melts like a dream. Cheddar brings the sharp, tangy flavor while Monterey Jack adds creaminess and helps everything stick together. Don’t even think about using pre-shredded cheese from a bag if you can avoid it. Shred it yourself and watch how much better it melts.
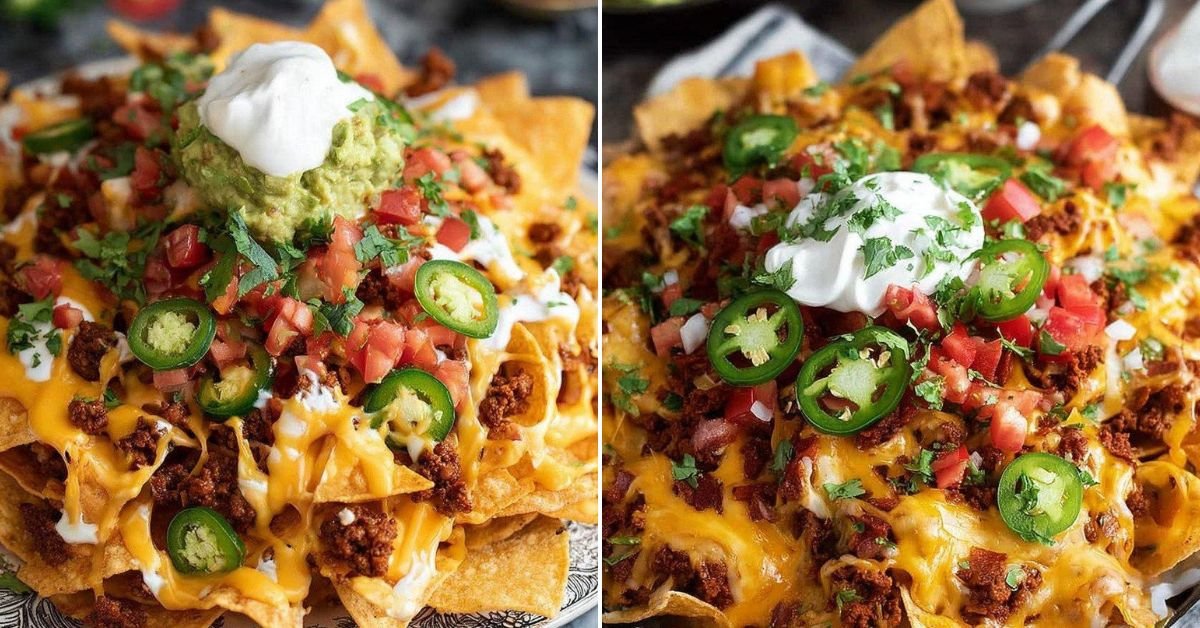
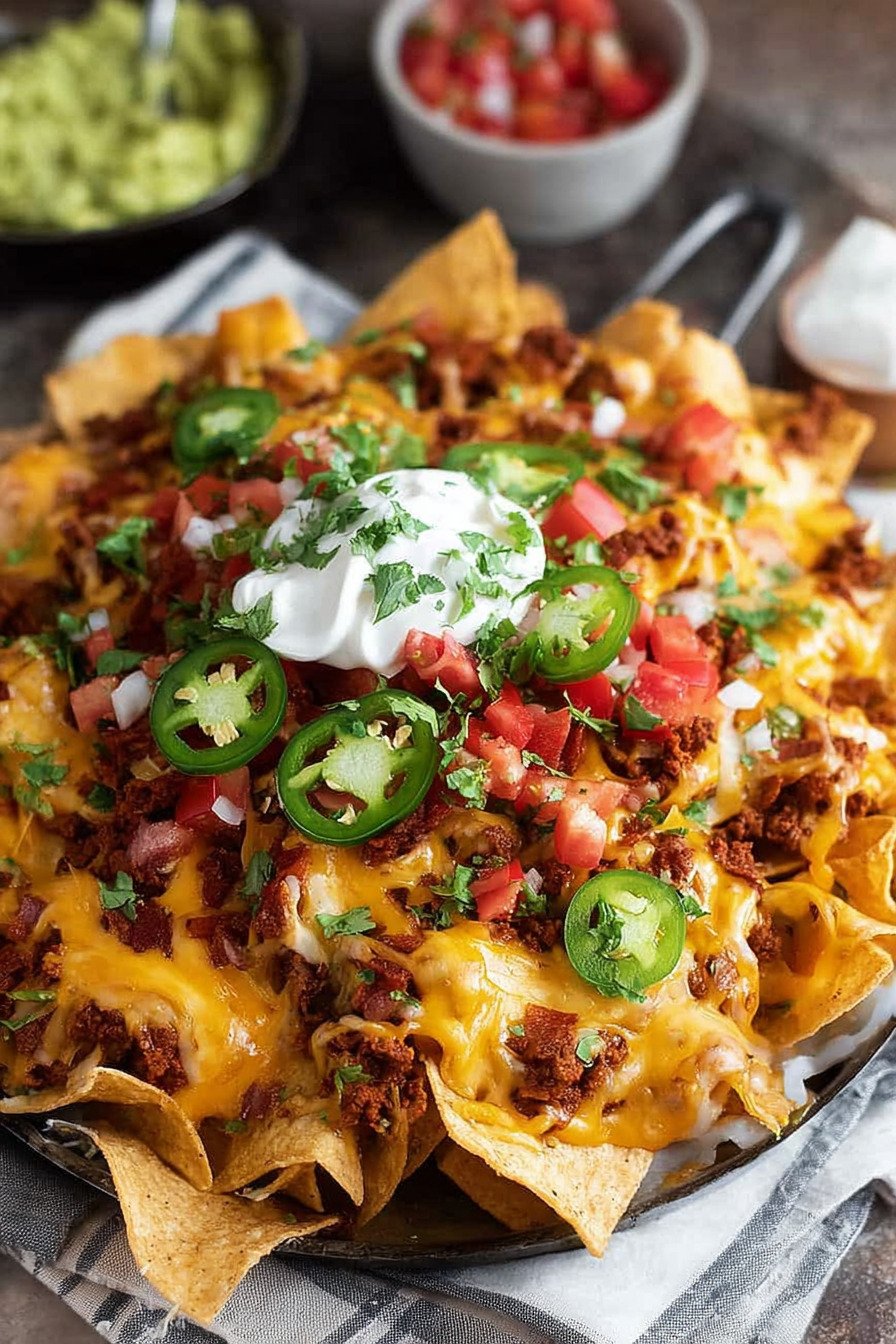
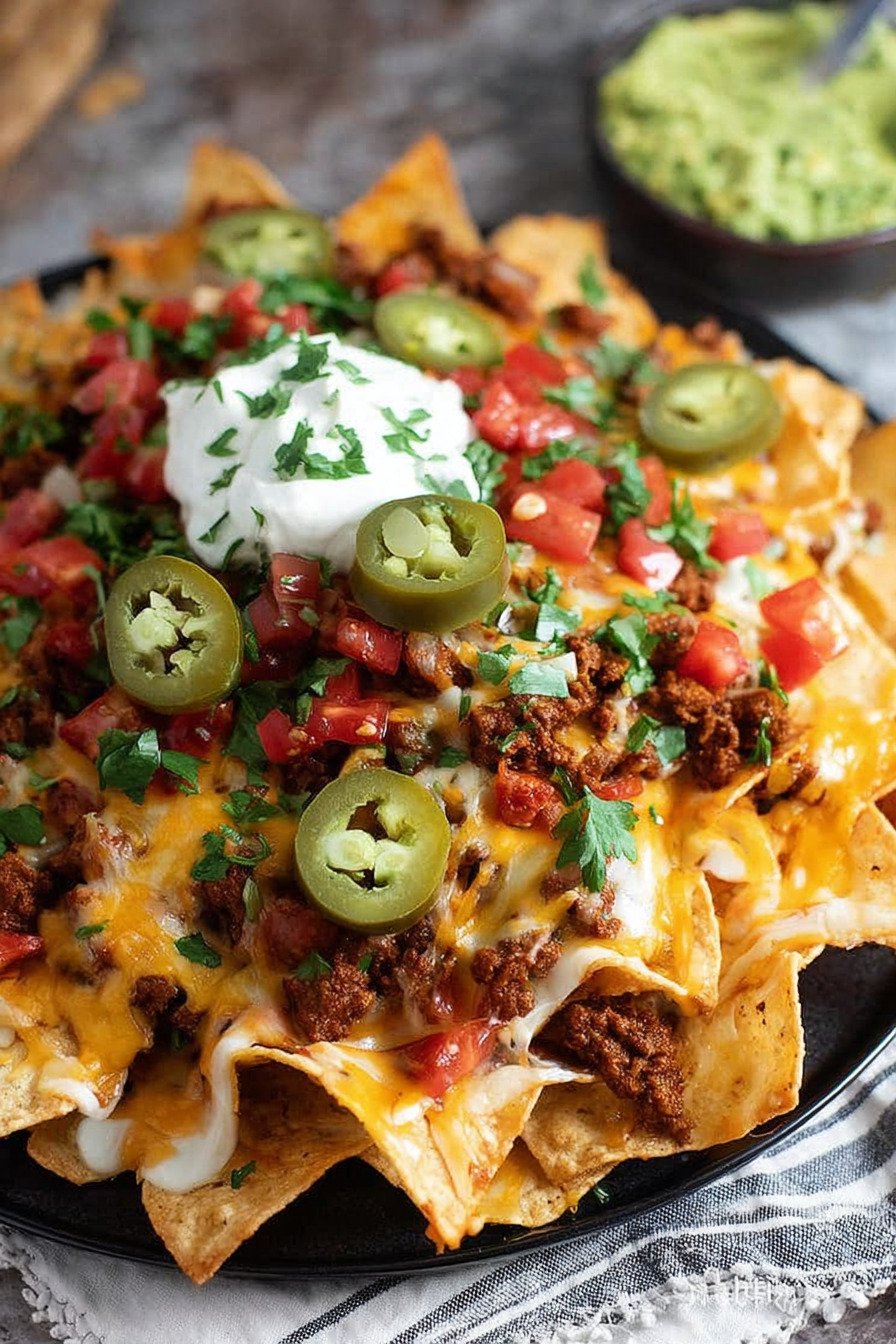
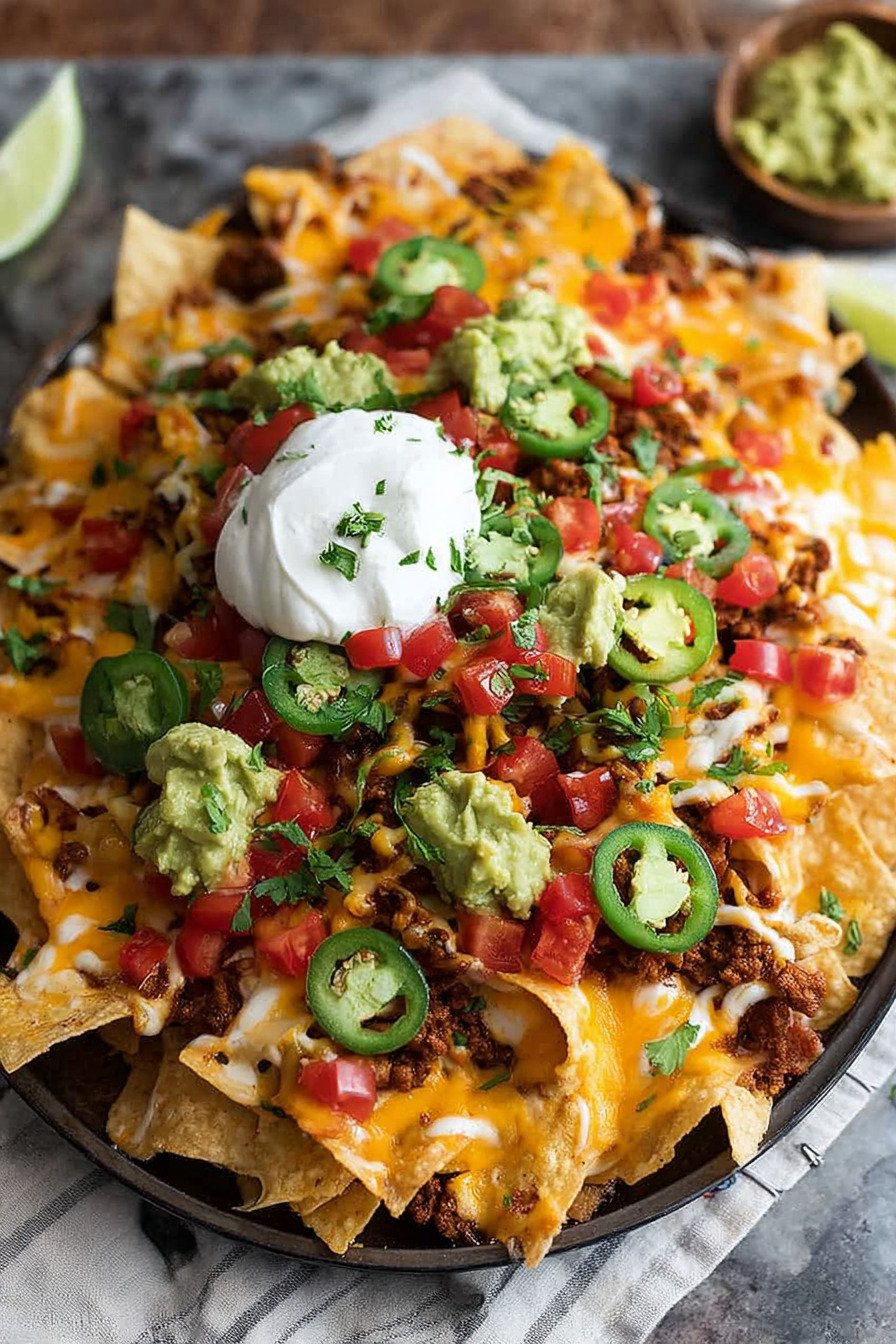
Can we talk about the toppings for a second? This is where you get to play around and make these nachos your own. I always go heavy on the jalapeños because I like my food with some kick, but you can dial that back if you’re feeding kids or people with delicate taste buds. The sour cream cools everything down, the guacamole adds richness, and fresh salsa brings brightness that cuts through all that cheese.
3) Ingredients for Loaded Nachos Supreme
Ground Beef: I use regular 80/20 ground beef for these nachos because you want some fat to keep the meat juicy and flavorful. When you brown it with taco seasoning, that fat carries all those spices and makes every bite taste amazing. You could use ground turkey or chicken if you’re trying to keep things lighter, but I’m telling you, beef just hits different here. Cook it until it’s nice and crumbly, drain off most of the grease, and you’re golden.
Taco Seasoning: Store bought seasoning packets work great for this recipe. I usually keep a few in my pantry for nights when I need dinner fast. If you’ve got time and want to make your own blend, go for it. But honestly, those little packets do the job perfectly. They bring all the cumin, chili powder, garlic, and paprika you need without measuring anything.
Tortilla Chips: This is where a lot of people mess up their nachos. You need thick, sturdy restaurant-style chips that can handle the weight of all these toppings. Those thin, crispy chips you get at the grocery store will turn into mush the second you add meat and cheese. Look for the thicker ones, and don’t be afraid to spend a couple extra bucks. Your nachos will thank you.
Cheddar Cheese: Sharp cheddar is my go-to here. It melts beautifully and has enough flavor to stand up to all the other ingredients. I like to buy a block and shred it myself right before I make the nachos. Pre-shredded cheese has that anti-caking stuff on it that keeps it from melting as smoothly. Trust me on this one. Five minutes of grating is worth it.
Monterey Jack Cheese: This is the secret weapon that makes the cheese sauce so creamy and stretchy. Monterey Jack has a mild flavor and incredible melting properties. When you combine it with the cheddar, you get this perfect balance of flavor and texture. Some people use all cheddar, but I think that’s a mistake. The Jack cheese makes everything better.
Jalapeños: Fresh jalapeños bring more flavor than the pickled ones, but pickled jalapeños are easier and last forever in your fridge. I keep both on hand and use whatever I’m in the mood for. If you’re worried about heat, remove the seeds and membranes before slicing. That’s where most of the spice lives. Or skip them altogether if spicy food isn’t your thing.
Sour Cream: Full-fat sour cream is the way to go here. The light stuff just doesn’t have the same richness and can taste a little watery. You want those cool, tangy dollops to contrast with the hot, spicy, cheesy nachos underneath. I usually put it in a squeeze bottle to make it easier to drizzle over the top, but a spoon works fine too.
Guacamole: Fresh guacamole takes these nachos to another level. You can make your own by mashing up some avocados with lime juice, salt, and maybe some diced tomatoes and onions. Or grab a container from the store if you’re short on time. Either way, that creamy avocado flavor pairs perfectly with everything else on the plate.
Fresh Salsa: Salsa adds brightness and acidity that balances out all the rich, heavy ingredients. I like pico de gallo style salsa with chunky tomatoes, onions, and cilantro. The fresh vegetables give you a little crunch and make you feel like you’re eating something healthy, even though let’s be real, these are nachos. Store-bought salsa is totally fine here.
4) How to Make Loaded Nachos Supreme
Step 1. Grab your largest skillet and set it over medium heat. Toss in the ground beef and break it up with a wooden spoon or spatula. You want to cook it for about six to eight minutes, stirring occasionally, until all the pink is gone and the meat looks nice and brown. Don’t walk away during this part because ground beef can go from perfectly cooked to burnt pretty quickly.
Step 2. Once your beef is cooked through, you’ll probably notice some grease pooling in the pan. Carefully drain off most of that fat by tilting the skillet and using a spoon to scoop it out, or pour it into a heat-safe container. Leave just a little bit in there to keep the meat from drying out. Then stir in your taco seasoning packet along with whatever amount of water it calls for on the package.
Step 3. Let that seasoned meat simmer for a couple minutes so all those spices really get in there and the liquid reduces down. You’ll smell it when it’s ready. The whole kitchen will smell like a taco shop. Meanwhile, turn your oven on to 375°F so it can preheat while you’re getting everything else ready.
Step 4. Take out your biggest baking sheet and spread those tortilla chips across it in a single layer. Don’t pile them up too much or you’ll end up with some chips getting all the good stuff while others stay naked and sad. You want every chip to have a shot at getting topped. If you need to use two baking sheets, that’s fine. Better to spread things out than to overcrowd.
Step 5. Now comes the fun part. Spoon that gorgeous seasoned beef all over your chips. Try to distribute it evenly so every section of the pan gets some meat. I like to use a big serving spoon for this and just dollop it around, then use the back of the spoon to spread it out a bit. You’re looking for good coverage without completely burying the chips.
Step 6. Time for the cheese! Take both your shredded cheddar and Monterey Jack and start sprinkling them generously over everything. Don’t be shy here. We’re making loaded nachos, not a light snack. You want enough cheese that when it melts, it’ll cascade down between the chips and create those amazing cheese pulls everyone loves. Cover every visible piece of beef and as many chips as you can.
Step 7. Slide that baking sheet into your preheated oven and set a timer for ten minutes. Check on it around the eight-minute mark to see how things are looking. You want the cheese fully melted, bubbly, and just starting to get a little golden around the edges. Some ovens run hotter than others, so keep an eye on it. You don’t want burnt chips.
Step 8. When you pull those nachos out of the oven, work fast because they’re best served hot. Scatter your sliced jalapeños over the top first. Then add dollops of sour cream and guacamole wherever you can find space. I like to put them in different spots so people can customize their bites. Spoon or drizzle your fresh salsa over everything, and if you’ve got fresh cilantro, throw some on top for color and flavor.
Step 9. Serve these nachos immediately while the cheese is still melty and gooey. Put the whole baking sheet on the table with some extra napkins because things are about to get messy in the best possible way. Everyone can dig in with their hands or use a fork if they’re feeling fancy. Just make sure you’re ready for people to fight over the chips with the most toppings.
5) Tips for Making Loaded Nachos Supreme
The biggest mistake people make with nachos is using chips that can’t handle the job. You need thick, sturdy chips that won’t fold or break under the weight of your toppings. I learned this the hard way at a party years ago when I used thin chips and ended up with a soggy mess. Now I only buy restaurant-style tortilla chips, and I make sure they’re fresh. Stale chips will ruin everything no matter how good your toppings are.
Layering is an art form that most people overlook. If you just pile everything on top, only the chips on the surface get any good stuff. What you want to do is create layers. Put down half your chips, add half the meat and cheese, then repeat. This way chips on both levels get loaded up. I’ve seen people at restaurants do three layers, which is next level, but two works great for home cooking.
Don’t add your cold toppings until after the nachos come out of the oven. I see people putting sour cream and guacamole on before baking, and then they wonder why it looks weird and separated. Those dairy-based toppings don’t do well in high heat. Keep them cold and add them at the last minute. Same goes for fresh salsa, cilantro, and any other garnishes.
Here’s a pro move that changed my nacho game completely. Before you add the meat, give your chips a light spray or drizzle of cooking oil and pop them in the oven for five minutes. This creates a barrier that keeps them from getting soggy when you add the wet toppings. It’s an extra step, but if you’re really serious about crispy nachos, it makes a difference.
Cheese distribution matters more than you think. You want to cover as much surface area as possible, but you don’t need to go crazy thick in any one spot. Spread it evenly, and make sure you get some cheese down between the chips, not just on top. When it melts, it’ll seep down and create those amazing cheese pockets that make nachos so addictive.
Watch your oven like a hawk during those last few minutes of baking. The difference between perfectly melted cheese and burnt edges happens fast. I set my timer for ten minutes but start checking at eight. If your oven runs hot, you might need to pull them even sooner. You’re looking for bubbly, melted cheese that’s just starting to brown, not dark and crispy.
Serve nachos on the baking sheet if you can. Transferring them to a platter seems like a good idea, but you lose chips and toppings in the process, and the whole thing can fall apart. Just put the hot baking sheet on a trivet or cutting board in the middle of the table and let people dig in. It’s more casual and way less stressful.
6) Making Loaded Nachos Supreme Ahead of Time
I get asked all the time if you can prep nachos ahead for parties, and the answer is yes, but with some smart planning. The meat is the easiest part to make in advance. Brown your ground beef, season it, and let it cool completely. Then store it in an airtight container in the fridge for up to three days. When you’re ready to make the nachos, just reheat the meat in a skillet or microwave until it’s warm.
Shredding your cheese ahead of time saves you work on party day. I’ll usually do this the morning of the event and keep the cheese in a sealed container or zip-top bag in the fridge. It stays fresh and ready to sprinkle. Just remember to let it sit out for about twenty minutes before you use it so it’s not ice cold. Room temperature cheese melts way better than cheese straight from the fridge.
You can prep all your toppings a few hours before you need them too. Slice the jalapeños, portion out the sour cream and guacamole into small bowls, and have the salsa ready to go. Cover everything with plastic wrap and keep it in the fridge. When your nachos come out of the oven, you’ll have everything right there ready to pile on top.
Here’s what you should NOT do ahead of time. Don’t assemble the nachos and let them sit. The chips will get soggy from the moisture in the meat and cheese, even if you haven’t baked them yet. You want to assemble and bake these as close to serving time as possible. The actual assembly only takes five minutes anyway, so it’s not like you’re saving much time.
If you’re hosting a bigger party and want to serve nachos in waves, keep your toppings warm in a slow cooker. The meat and cheese sauce can stay hot and ready, and you can assemble fresh batches every thirty minutes or so. This way everyone gets hot, crispy nachos instead of a lukewarm pile that’s been sitting out.
For game day parties, I like to set up a nacho bar where people can build their own. Keep the baked chips and cheese on one end, and line up bowls of meat, jalapeños, sour cream, guacamole, and salsa along the table. Everyone customizes their plate exactly how they want it, and you don’t have to worry about someone not liking an ingredient you already put on.
7) Storing Leftover Loaded Nachos Supreme
Let’s be honest, you probably won’t have leftovers. These nachos disappear fast. But if you somehow manage to have some remaining, storing them properly makes a big difference in how they taste when you reheat them. The sad truth is that nachos don’t keep as well as other foods because the chips lose their crunch once they’ve been topped and baked.
If you’ve got leftover fully loaded nachos, scrape them into an airtight container and stick them in the fridge. They’ll keep for a day or two max. Don’t expect them to be crispy when you reheat them though. The chips will have absorbed moisture from the toppings and turned soft. They’re still edible and tasty, just different from fresh nachos.
A better strategy is to store the components separately if you can. Keep any leftover meat in one container, extra cheese in another, and toppings in their own containers. This way you can make fresh nachos whenever you want using the pre-cooked meat. Just lay out new chips, add the meat and cheese, and bake. It’s almost as fast as reheating and tastes way better.
When you do need to reheat fully assembled leftover nachos, your oven is your best bet. Set it to 350°F and spread the nachos on a baking sheet. Heat them for about eight to ten minutes until the cheese melts again. They won’t get crispy, but at least they’ll be warm and the cheese will get gooey again. Don’t use the microwave unless you enjoy sad, rubbery nachos.
Here’s a creative way to use leftover nachos that I stumbled on by accident. Chop them up and use them as a filling for quesadillas or burritos. Sounds weird, but it actually works. The chips add texture, and all those toppings are already combined. Just fold everything into a tortilla with some extra cheese and grill it up. Problem solved.
The cold toppings like sour cream and guacamole should always be stored separately from the hot components. Guacamole turns brown pretty quickly, so press plastic wrap directly on its surface before you seal the container. Sour cream will last about a week in the fridge. Salsa depends on whether it’s fresh or jarred, but fresh stuff should be used within three to four days.
My final piece of advice is to just make less food if you’re worried about leftovers. It’s better to leave people wanting more nachos than to end up with a container full of soggy chips in your fridge. You can always make a second batch if the first one disappears, and fresh nachos are so much better than reheated ones that it’s worth the extra effort.
8) Try these Appetizers next!
9) Loaded Nachos Supreme
Best Nachos Recipe: Loaded Supreme Style in Under 30 Minutes
Ingredients
- 1 pound ground beef
- 1 packet taco seasoning
- 12 ounces tortilla chips (get the thick kind)
- 1 cup shredded cheddar cheese
- 1 cup shredded Monterey Jack cheese
- 1/2 cup sliced jalapeños (fresh or pickled)
- 1/2 cup sour cream
- 1/2 cup guacamole
- 1/2 cup fresh salsa
- Salt and pepper to taste
- Fresh cilantro for garnish
Instructions
- Heat a large skillet over medium heat and toss in the ground beef. Break it up as it cooks and let it brown for about 6 to 8 minutes. You want it nice and crumbly.
- Drain off any excess grease (nobody needs that), then stir in your taco seasoning. Add a splash of water if the packet calls for it and let everything simmer together for a couple minutes.
- While the meat’s doing its thing, preheat your oven to 375°F. Grab a big baking sheet and spread out your tortilla chips in a nice even layer. Don’t stack them too high or you’ll end up with sad, soggy nachos.
- Spoon that beautiful seasoned beef all over your chips. Get it everywhere, you want every bite to have some meat.
- Now comes the fun part. Sprinkle both cheeses generously over the whole thing. Don’t be shy here, we’re making loaded nachos, not a sad desk lunch.
- Pop the baking sheet in the oven and bake for 10 to 12 minutes. You’re looking for that cheese to get all melty and bubbly. Keep an eye on it so the chips don’t burn.
- Pull it out of the oven (careful, it’s hot!) and immediately scatter your jalapeño slices across the top.
- Add dollops of sour cream and guacamole wherever you can find space. Drizzle or spoon the salsa over everything.
- Throw some fresh cilantro on top if you’ve got it, grab some friends, and dig in while they’re still warm and gooey.
10) Nutrition
Serving Size: 1/4 of nachos | Calories: 562 | Sugar: 3.1 g | Sodium: 892 mg | Fat: 34.2 g | Saturated Fat: 14.8 g | Carbohydrates: 38.4 g | Fiber: 3.2 g | Protein: 28.6 g | Cholesterol: 89.4 mg

Leave a Comment