

Look, I’ve been making this rotisserie chicken casserole for years, and it never gets old. You know those nights when you’re tired, the fridge is looking a bit sad, but you still want something that feels like a real meal? That’s exactly when I pull this recipe out. What I love most about this dish is how flexible it is. Got leftover rotisserie chicken from last night’s dinner? Perfect. Picked one up from the store on your way home? Even better. This recipe with rotisserie chicken transforms that humble bird into something really special. We’re talking creamy, comforting, and honestly pretty hard to mess up. I’ve tried so many rotisserie chicken casserole recipes over the years, but this one keeps winning in my house. It’s one of those easy rotisserie chicken recipes that looks fancy enough for company but simple enough for a Tuesday. My neighbor swears by healthy rotisserie chicken recipes with tons of veggies, and you can totally go that route too. Some folks even make crockpot rotisserie chicken recipes out of this, though I’m partial to the oven version myself. And if you’re into meal prep, this works just as well cold as a rotisserie chicken salad recipe the next day. Trust me on that one.
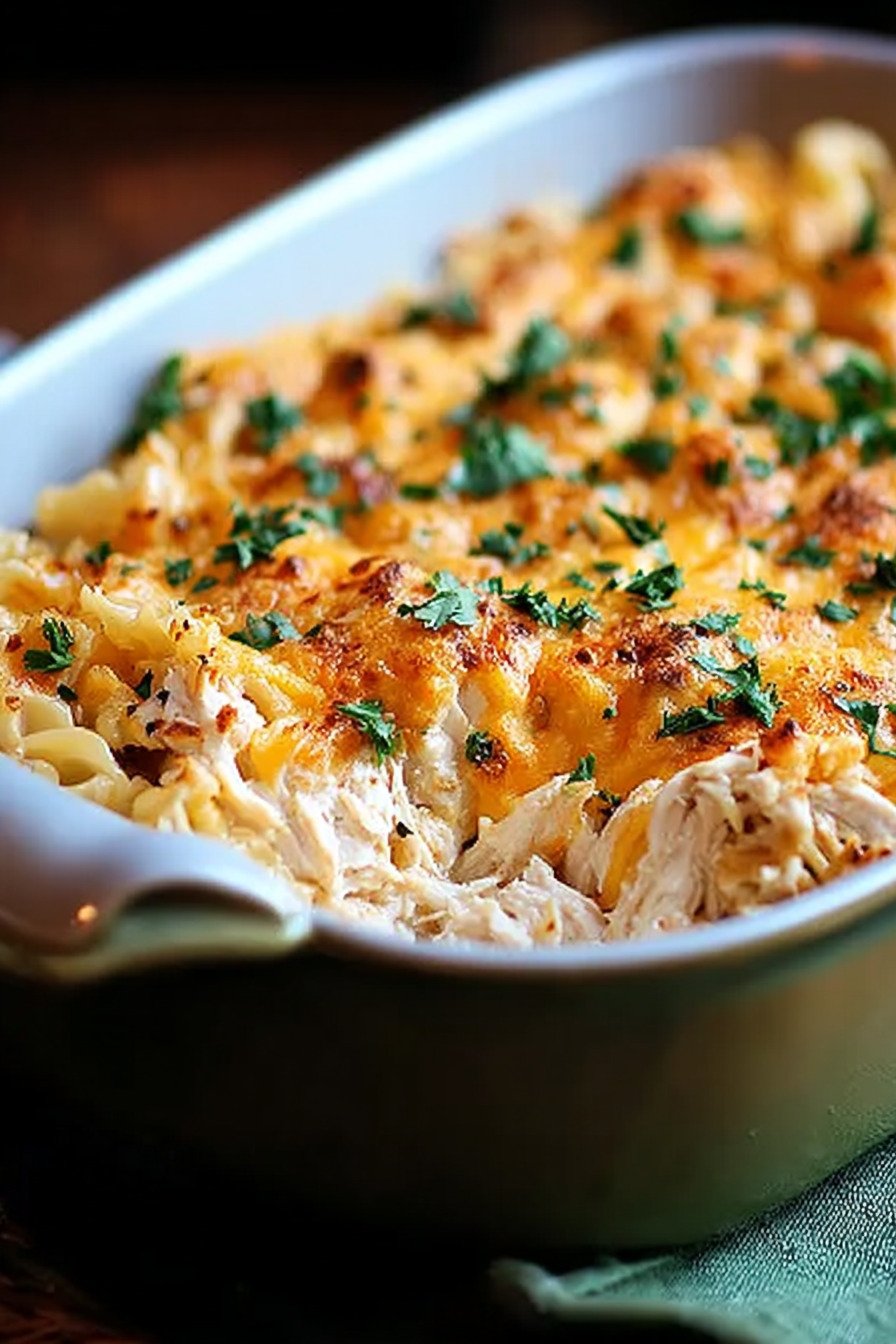
Table of Contents
- 1) Key Takeaways
- 2) Easy Rotisserie Chicken Casserole Recipe
- 3) Ingredients for Rotisserie Chicken Casserole
- 4) How to Make Rotisserie Chicken Casserole
- 5) Tips for Making Rotisserie Chicken Casserole
- 6) Making Rotisserie Chicken Casserole Ahead of Time
- 7) Storing Leftover Rotisserie Chicken Casserole
- 8) Try these Main Course next!
- 9) Rotisserie Chicken Casserole
- 10) Nutrition
1) Key Takeaways
- What makes rotisserie chicken casserole so easy to prepare?
- Can you freeze rotisserie chicken casserole for later?
- What vegetables work best in chicken casserole?
- How do you keep chicken casserole from drying out?

2) Easy Rotisserie Chicken Casserole Recipe
Listen, I’m all about rotisserie chicken recipes that actually save me time. This one’s been my go to for about five years now, and I keep coming back to it when I need something comforting but don’t want to spend all evening in the kitchen. You grab a rotisserie chicken on your way home, toss everything together, and boom, dinner’s ready in under an hour.
What I really love about this rotisserie chicken recipes approach is how forgiving it is. Forgot to defrost something? No problem. Kids are hungry and cranky? This’ll be on the table fast. The recipe with rotisserie chicken I’m sharing today has saved me on countless busy weeknights. My neighbor Kelly actually asked me for this recipe three times because she kept losing the paper I wrote it on. Now she just texts me when she needs it.
The thing about rotisserie chicken casserole recipes is that they can go one of two ways. Either they’re bland and boring, or they’re swimming in so much cream you feel guilty eating them. This one hits that sweet spot right in the middle. It’s creamy, sure, but it doesn’t feel heavy. You can actually taste the chicken and the vegetables, not just a bunch of processed soup.
I’ve tried tons of easy rotisserie chicken recipes over the years. Some were winners, others went straight to the “never again” pile. This casserole survived the test because my whole family actually eats it without complaining. That’s saying something when you’ve got picky eaters at the table. Even my sister, who swears she only makes healthy rotisserie chicken recipes, admitted this one wasn’t too bad.
Now, I know some people are really into their crockpot rotisserie chicken recipes, and I get it. Set it and forget it sounds amazing. But honestly? For this particular dish, the oven gives you that golden, crispy top that makes everyone fight over the corner pieces. That said, I’ll share some slow cooker tips later if that’s your thing. And here’s a fun fact: if you’ve got leftovers, this actually makes a pretty decent rotisserie chicken salad recipe the next day. Just chop it up cold and eat it straight from the fridge. Don’t judge me.
3) Ingredients for Rotisserie Chicken Casserole
Cooked Rotisserie Chicken: This is where the magic starts. You can shred it, cube it, or honestly just tear it apart with your hands like I usually do. Store bought rotisserie chicken is perfect here, but if you’ve got leftover roasted chicken from Sunday dinner, that works too. I usually need about three cups total, which is roughly one whole chicken after you’ve picked off all the good meat. Don’t stress about getting every last bit off the bones. Save those bones for stock if you’re feeling ambitious, or just toss them if you’re not.
Egg Noodles or Pasta: I’m partial to egg noodles for this because they soak up the sauce so nicely and give you that classic casserole vibe. My mom always used egg noodles, so maybe I’m biased. But really, any short pasta works great here. Penne, rotini, shells, whatever you’ve got in the pantry. Just cook them until they’re done but still have a little bite to them. You want them a touch firmer than you’d normally eat them since they’ll keep cooking in the oven.
Cream of Chicken Soup: Yeah, I know, some people turn their nose up at canned soup. But you know what? It works. It’s consistent, it’s easy, and it creates that creamy base we’re looking for without having to make a whole roux from scratch. I’ve been using the same brand for years. If you want to make your own cream sauce, go for it, but I’m giving you the real version I actually make on a Tuesday night.
Sour Cream: This is what takes the casserole from good to really good. It adds this tangy richness that cuts through all the creaminess and keeps things interesting. I use full fat sour cream because life’s too short for the fat free stuff, but use what you’ve got. Just make sure it’s at room temperature so it mixes in smoothly. Cold sour cream can get lumpy and weird, and nobody wants that.
Shredded Cheddar Cheese: Get the good stuff if you can. I mean, pre shredded is fine for convenience, and I use it all the time. But if you have an extra minute, shredding a block of sharp cheddar yourself makes a difference. It melts better and tastes more, well, cheesy. I like sharp cheddar for the flavor, but mild works too if that’s what your family prefers. Or go wild and use a blend. Monterey jack mixed with cheddar is pretty great.
Milk: Just regular whole milk. It loosens up the sauce a bit so it’s not too thick. I’ve used two percent before and it was fine. Probably wouldn’t go lower than that, though. You need a little fat content to keep everything creamy. If you’re out of milk, chicken broth works in a pinch. The flavor’s a little different but it still tastes good.
Frozen Mixed Vegetables: This is where you can really make it your own. I usually grab a bag of that classic mix with peas, carrots, corn, and green beans. But if your kids hate peas, use something else. Broccoli florets work great. So do chopped green beans on their own. My friend swears by adding mushrooms, but I’m not a huge mushroom person. You do you. Just make sure they’re thawed a bit before mixing them in, or they’ll release too much water.
Breadcrumbs: This is for that crunchy topping that makes everyone happy. I keep a container of plain breadcrumbs in my pantry just for things like this. Panko works too and actually gives you an even crunchier top. Some people use crushed crackers, like Ritz or butter crackers. That’s a whole different level of delicious, but also a whole different flavor profile. Try it sometime when you’re feeling adventurous.
Melted Butter: To mix with the breadcrumbs so they get all golden and toasty in the oven. Don’t skip this step. Dry breadcrumbs just sit there sadly on top. Butter mixed breadcrumbs turn into that crispy, golden crust that makes this casserole special. I usually melt about two tablespoons. Sometimes I add a little garlic powder to the butter first. Game changer.
Garlic Powder and Onion Powder: These are my secret weapons for adding flavor without adding work. Fresh garlic is great when you have time to mince it, but powder gives you consistent flavor throughout. Same with onion powder. It’s that subtle background flavor that makes people say “this is really good” without being able to pinpoint exactly why. Don’t overdo it, though. A little goes a long way.
Salt and Pepper: Season to your taste. I usually go light on the salt at first since the soup and cheese already have quite a bit. You can always add more later. Fresh cracked black pepper is nice here. It adds a little heat and complexity. I probably use more pepper than most people, but that’s just how I like it.
Fresh Parsley: Totally optional, but it makes the dish look prettier when you’re serving it. Sometimes I remember to buy parsley, sometimes I don’t. If you’ve got it, chop some up and sprinkle it on top right before serving. It adds a little fresh flavor and makes it look like you tried harder than you actually did. Win win.

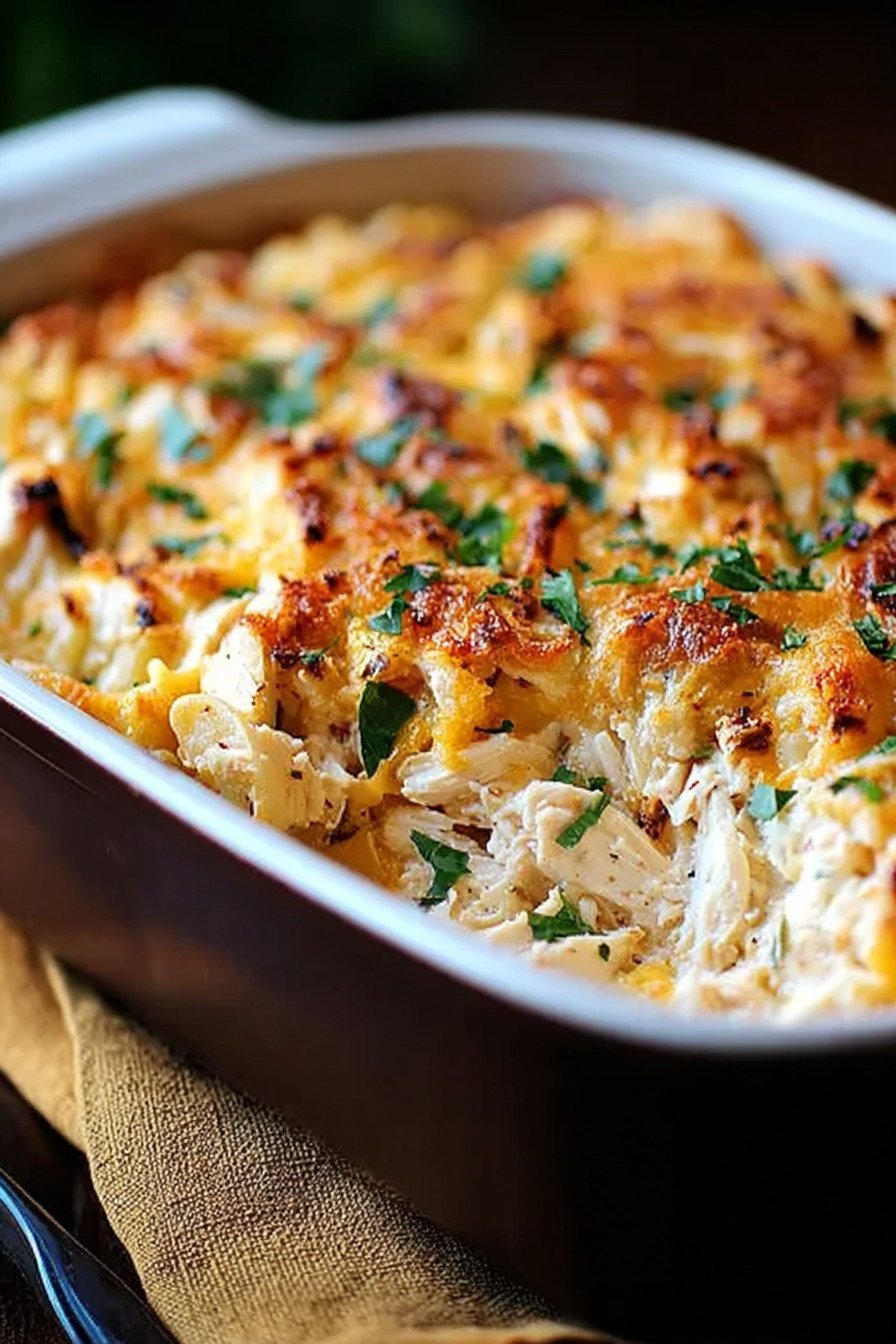
4) How to Make Rotisserie Chicken Casserole
Step 1. Get your oven heating up to 350 degrees. This is important to do first because nothing’s more annoying than having everything ready and then realizing you forgot to preheat. Grab your 9×13 baking dish and give it a light spray with cooking oil or rub it with a little butter. I’ve forgotten this step before and paid the price with stuck on cheese. Learn from my mistakes.
Step 2. Cook your noodles according to whatever the package says. I usually set a timer because I have a bad habit of forgetting about boiling pasta and then coming back to mush. You want them al dente, which basically means they still have a tiny bit of firmness when you bite them. They’ll finish cooking in the oven, so undercooking slightly is better than overcooking. Drain them well and set them aside. I usually drizzle a tiny bit of olive oil on them so they don’t stick together while I’m getting everything else ready.
Step 3. In your biggest mixing bowl (you’re going to need the room), combine the cream of chicken soup, sour cream, milk, garlic powder, and onion powder. Mix it up until everything’s smooth and there aren’t any lumps of sour cream hanging out. I use a whisk for this because it’s faster, but a big spoon works fine too. The sauce should be pourable but not watery. If it looks too thick, add a splash more milk.
Step 4. Now comes the fun part. Throw in your shredded chicken, cooked noodles, frozen veggies, and about half of your shredded cheese. Keep the other half for later. Stir everything together until all the noodles and chicken are coated with sauce. This is where I usually taste it and adjust the salt and pepper. Remember, you can always add more seasoning but you can’t take it away, so go easy at first.
Step 5. Dump the whole mixture into your prepared baking dish. Use a spoon or spatula to spread it out evenly so it cooks uniformly. I like to make sure the top is relatively flat so the breadcrumb topping distributes nicely. If you’ve got some noodles poking up here and there, that’s fine. They’ll get extra crispy and those are the best bites.
Step 6. In a small bowl, mix your breadcrumbs with the melted butter. Stir it around until all the breadcrumbs are coated. Then sprinkle this mixture over the top of your casserole. Try to get even coverage, but don’t stress too much about it. Some spots will have more than others and that’s part of the charm. Take your remaining cheese and sprinkle it over the breadcrumbs. Yes, cheese on top of breadcrumbs. Trust me on this one.
Step 7. Slide the whole thing into your preheated oven. Set your timer for 25 minutes but start checking around 20. Every oven’s a little different. You’re looking for the edges to be bubbling and the top to be golden brown. If the top’s getting too dark but the middle isn’t hot enough yet, you can tent some foil over it. I’ve only had to do this once or twice when my oven was running hot.
Step 8. When it comes out, resist the urge to dig in immediately. I know it smells amazing and you’re hungry, but give it about five minutes to set up. This helps it hold together better when you scoop it out. Plus you won’t burn your mouth. Use this time to sprinkle on that fresh parsley if you’ve got it, or to make a quick side salad, or to just stand there and admire your work. You earned it.
5) Tips for Making Rotisserie Chicken Casserole
Let me share some things I’ve learned the hard way over the years. First off, don’t overcook your pasta. I mentioned this before but it’s worth repeating. Mushy noodles in a casserole are just sad. They turn into this paste like texture that nobody wants. Cook them just until they’re done, maybe even pull them off the heat a minute early. They’re going in the oven for another half hour, so they’ll finish cooking there.
Room temperature ingredients mix better. If your sour cream is straight from the fridge, it’s going to be a pain to stir in smoothly. Same with the cream of chicken soup if you store it in the fridge after opening. Just take them out when you start prepping everything else and let them warm up a bit. Makes your life easier. I learned this from my aunt who’s been making casseroles since before I was born.
Taste your mixture before it goes in the oven. This is your chance to fix the seasoning. Once it’s baked, you’re stuck with whatever flavor you’ve got. I always grab a spoon and take a little taste of the mixture after I’ve stirred everything together. Too bland? Add more salt, garlic powder, maybe some pepper. Just right? Perfect, you’re good to go. This simple step has saved me from serving boring casseroles more times than I can count.
If you want to make this a bit healthier, there are some swaps you can do. Use Greek yogurt instead of sour cream. It’s got more protein and less fat. You can use a reduced fat cream soup too. I won’t lie and say it tastes exactly the same, but it’s still good. You could also add more vegetables and less pasta. Sometimes I throw in some chopped spinach or extra broccoli just to make myself feel better about the cheese situation.
The breadcrumb topping is really where you can get creative. Like I said, crushed Ritz crackers are amazing. But you could also use panko, or even crushed cornflakes if you want something different. My grandmother used to crush up potato chips for the topping sometimes. Sounds weird, tastes incredible. French fried onions like the ones you put on green bean casserole? Also a winner. Don’t be afraid to experiment.
One more thing about that rotisserie chicken. The dark meat is juicier and has more flavor, so don’t just use breast meat. Mix in some of that thigh and leg meat too. It makes the whole dish more interesting. Plus, you paid for the whole chicken, might as well use it all. I usually end up with a mix of white and dark meat naturally, and that’s perfect.
6) Making Rotisserie Chicken Casserole Ahead of Time
This is one of those dishes that’s actually perfect for making ahead. I do this all the time when I know I’m going to have a crazy day. You can prep the whole thing the night before or even the morning of, stick it in the fridge, and then just pop it in the oven when you get home. It’s like having a home cooked meal without actually cooking when you’re tired and cranky.
Here’s how I do it. Follow all the steps for mixing everything together, but stop before you add the breadcrumb topping. So you’ve got your chicken, noodles, veggies, and sauce all mixed in the baking dish. At this point, just cover it tightly with plastic wrap or aluminum foil and stick it in the fridge. It’ll keep fine for up to 24 hours. When you’re ready to bake it, take it out of the fridge while your oven preheats. This takes the chill off a bit.
Now mix up your breadcrumb topping fresh and add it right before baking. If you add it too early, it’ll get soggy sitting on top of the casserole in the fridge. Nobody wants soggy breadcrumbs. Once you’ve added the topping, it goes into the oven. You might need to add an extra five or ten minutes to the baking time since it’s starting cold. Just keep an eye on it. When it’s bubbling around the edges and the top is golden, you’re good.
I’ve even assembled this completely, frozen it, and baked it later. That takes a bit more planning, but it works. Wrap it really well in plastic wrap and then foil before freezing. It’ll keep for about two or three months. When you want to use it, thaw it in the fridge overnight and then bake as usual. I’ve done this when I knew I’d be recovering from minor surgery or when I was helping a friend who just had a baby. Having meals in the freezer ready to go is such a relief.
The only thing I’d say about freezing is that the texture of the noodles can change slightly. They might be a tiny bit softer after freezing and reheating. It’s not a dealbreaker by any means, just something I’ve noticed. The flavor is still great. If you’re really particular about texture, maybe just refrigerate it for a day or two instead of freezing. But honestly, frozen and reheated is still way better than takeout on a busy night.
7) Storing Leftover Rotisserie Chicken Casserole
Leftovers are actually one of the best parts of this recipe. This casserole keeps really well and sometimes I think it tastes even better the next day after all the flavors have had time to hang out together. Once it’s cooled down to room temperature, transfer it to an airtight container or just cover your baking dish tightly with foil or plastic wrap. It’ll last in your fridge for about four or five days.
Reheating is easy. If you’re just warming up a single portion, the microwave works fine. I usually do about a minute and a half on high, stir it around, and then another 30 seconds if it needs it. The breadcrumb topping won’t be crispy anymore, but it still tastes good. If you want to get that crispy top back, your best bet is reheating it in the oven. Put your portion in an oven safe dish, cover it with foil so it doesn’t dry out, and warm it at 350 degrees for about 15 minutes.
You can freeze leftovers too. I portion them out into individual servings in those disposable aluminum containers. Then I can just grab one for lunch and heat it up at work. Or if you’re reheating at home, thaw it overnight in the fridge and then warm it up. Frozen leftovers are good for about two or three months. After that they’re still safe to eat, but the quality starts to go downhill.
Here’s a weird thing I do with leftovers sometimes. If they’ve been in the fridge for a couple days and the breadcrumb topping is all soft, I’ll scrape it off and add fresh breadcrumbs mixed with butter on top before reheating. It’s a little extra work but it makes it feel like fresh casserole again. Or sometimes I’ll just embrace the softer topping. Depends on my mood and how much effort I want to put in.
My kids actually fight over leftover casserole for lunch. I pack it in their thermoses and it stays hot until lunchtime. They say their friends are jealous of their lunch, which makes me feel like I’m winning at this whole parenting thing. It beats the days when I’m throwing together a sad sandwich at 7am because I forgot to plan ahead.
8) Try these Main Course next!
9) Rotisserie Chicken Casserole
Easy Rotisserie Chicken Recipes: Creamy Casserole Everyone Loves
Ingredients
- 3 cups cooked rotisserie chicken, shredded or cubed
- 2 cups cooked egg noodles or pasta
- 1 can (10.5 oz) cream of chicken soup
- 1 cup sour cream
- 1 cup shredded cheddar cheese
- 1/2 cup milk
- 1 cup frozen mixed vegetables (peas, carrots, corn)
- 1/2 cup breadcrumbs
- 2 tablespoons melted butter
- 1/2 teaspoon garlic powder
- 1/2 teaspoon onion powder
- Salt and pepper to taste
- Fresh parsley for garnish (optional)
Instructions
- Preheat your oven to 350°F (175°C). Grab a 9×13 inch baking dish and give it a light spray with cooking oil.
- Cook your egg noodles according to the package directions. Drain them well and set aside.
- In a large mixing bowl, combine the cream of chicken soup, sour cream, milk, garlic powder, and onion powder. Mix until everything’s nice and smooth.
- Toss in your shredded rotisserie chicken, cooked noodles, frozen veggies, and half of the shredded cheese. Stir it all together until everything’s coated with that creamy sauce. Taste and add salt and pepper as needed.
- Pour the whole mixture into your prepared baking dish and spread it out evenly.
- In a small bowl, mix together the breadcrumbs and melted butter. Sprinkle this over the top of your casserole, then add the remaining cheese on top.
- Pop it in the oven and bake for about 25 to 30 minutes, or until the top is golden and the casserole is bubbling around the edges.
- Let it cool for about 5 minutes before serving. Sprinkle some fresh parsley on top if you’re feeling fancy.
10) Nutrition
Serving Size: 1/6 of the casserole | Calories: 425 | Sugar: 3.2 g | Sodium: 780 mg | Fat: 22 g | Saturated Fat: 11 g | Carbohydrates: 28 g | Fiber: 2.5 g | Protein: 28 g | Cholesterol: 95 mg


Leave a Comment