

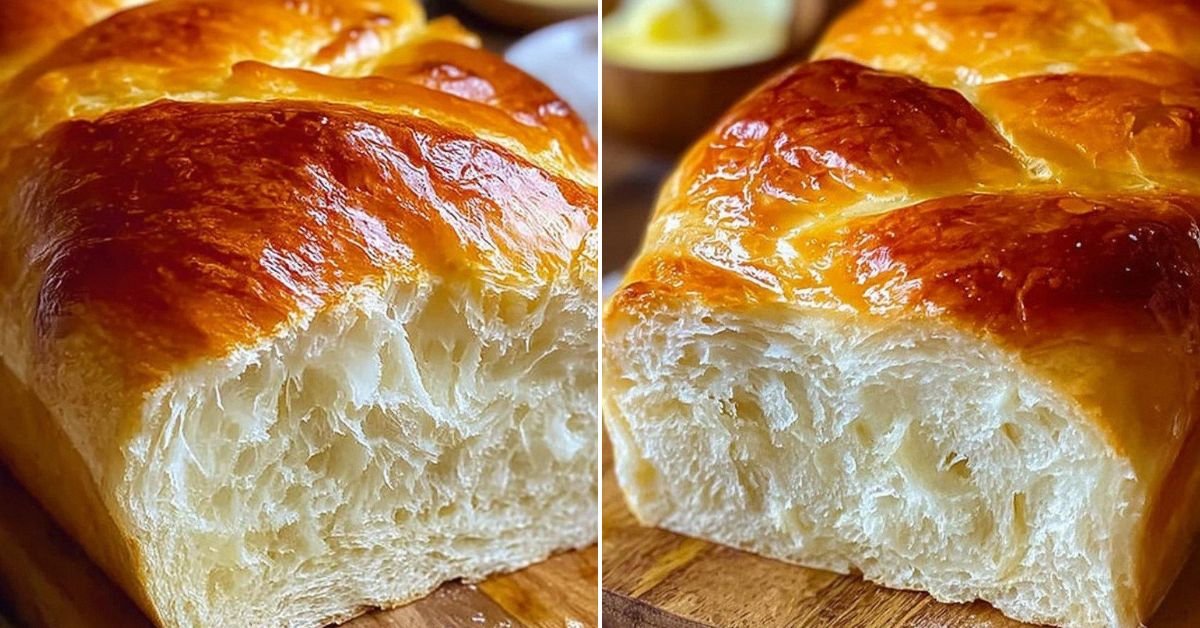
I’ve been making this sandwich bread recipe for years now, and let me tell you, it never gets old. You know that feeling when you slice into a fresh loaf and the crust just crackles? That’s what we’re talking about here. What I love most is how forgiving this bread is. You can let it rise for just a couple hours if you’re in a hurry, or leave it overnight while you sleep and wake up to incredible flavor. The best part? You don’t need any fancy equipment or kneading skills. Just four ingredients and a bowl. I remember the first time I tried this artisan bread recipe, I was shocked at how simple it was. My kitchen smelled like a bakery, and my family thought I’d spent hours working on it. The secret is in the slow rise, which does all the heavy lifting for you. Whether you’re using this easy artisan bread recipe for morning toast, lunchtime sandwiches, or just tearing off chunks to dip in soup, it works beautifully. I’ve experimented with all sorts of artisan bread recipes over the years, but this one remains my go to. Some people ask me about using this as a sandwich bread recipe sourdough style, and while this isn’t true sourdough, the long fermentation gives it that tangy complexity. Trust me, once you try this best sandwich bread recipe, you’ll never go back to store bought. And if you have a bread machine sandwich bread recipe you love, give this a shot anyway. The texture and crust are worth the tiny bit of extra effort.

Table of Contents
- 1) Key Takeaways
- 2) Easy Sandwich Bread Recipe
- 3) Ingredients for Sandwich Bread
- 4) How to Make Sandwich Bread
- 5) Tips for Making Sandwich Bread
- 6) Making Sandwich Bread Ahead of Time
- 7) Storing Leftover Sandwich Bread
- 8) Try these Bread next!
- 9) Sandwich Bread Recipe
- 10) Nutrition
1) Key Takeaways
- What makes this sandwich bread recipe different from store bought bread?
- Can you really make artisan bread with just four ingredients?
- Why is no kneading required for this easy artisan bread recipe?
- How long does homemade sandwich bread stay fresh?

2) Easy Sandwich Bread Recipe
Let me tell you something about this sandwich bread recipe that changed my entire perspective on baking. I used to think making bread at home meant hours of kneading, special equipment, and some kind of mystical baking talent I just didn’t have. Then I stumbled onto this artisan bread recipe method and everything clicked. This bread is shockingly simple, and I mean that in the best way possible.
What makes this easy artisan bread recipe so special? We’re talking four ingredients here. Flour, salt, yeast, and water. That’s it. No sugar, no milk, no butter, no eggs. Just those four basics working together to create something that tastes like it came from a fancy bakery. The first time I pulled a loaf out of my oven, my neighbor knocked on my door asking what smelled so good. I’ve been making it weekly ever since.
The no knead method is where the magic happens. You just mix everything in a bowl, let time do the work, and wake up to dough that’s ready to bake. Perfect for those of us who want fresh bread but don’t want to spend our entire Sunday in the kitchen. I’ve tried plenty of artisan bread recipes over the years, and this one wins every single time for ease and flavor.
Can we talk about texture for a second? The crust on this bread crackles when you slice into it. That sound alone makes my morning coffee taste better. Inside, you get those beautiful irregular holes that tell you the fermentation did its job. It’s chewy but not tough, soft but not squishy. Spread some butter on a warm slice and try not to eat the whole loaf in one sitting. I dare you.
I’ve used this as a sandwich bread recipe sourdough alternative for friends who can’t handle the long sourdough process. They love it. The extended rise gives you some of that tangy complexity without needing a starter or days of planning. Just mix it before bed and bake it when you wake up. If you’re searching for the best sandwich bread recipe that doesn’t involve artificial additives or preservatives, this is your answer.
People always ask me if it’s better than their bread machine sandwich bread recipe. Look, bread machines are convenient, but there’s something about this rustic loaf that just hits different. The crust alone makes it worth the tiny extra effort of shaping it by hand. Plus, you can actually pronounce every ingredient in this bread, which feels pretty good when you’re feeding it to your family.

3) Ingredients for Sandwich Bread
All Purpose Flour or Bread Flour
I usually grab whatever flour I have in my pantry, and it works beautifully. All purpose flour gives you a softer crumb that’s perfect for sandwiches. Bread flour has more protein, so you’ll get a chewier texture with bigger air pockets. Both work great, so don’t stress if you only have one or the other. I’ve done half and half before when I ran low on bread flour, and it turned out awesome. Just measure it properly and you’re golden.
Kosher Salt
Salt isn’t just for flavor here, though it definitely makes the bread taste way better. It actually controls the fermentation and strengthens the gluten structure. I prefer kosher salt for the crystal size and the way it dissolves, but table salt works too if that’s what you’ve got. Just use a bit less if you’re swapping table salt for kosher, since table salt is denser. Don’t skip the salt thinking you’ll make it healthier. Trust me, the bread needs it.
Instant or Active Dry Yeast
Either type works perfectly in this recipe. Instant yeast can go straight into the flour without proofing, which I love for speed. Active dry yeast might need a quick wake up in warm water first, but honestly, I’ve thrown it right in with the flour too and it’s been fine. One packet is about 2 and a quarter teaspoons if you’re buying yeast in bulk. Keep your yeast in the fridge or freezer to keep it fresh longer. Nothing worse than sad, dead yeast ruining your bread plans.
Warm Water
Temperature matters here, and I learned this the hard way after killing yeast with water that was way too hot. You want it around 105 degrees Fahrenheit, which feels warm but not hot when you dip your finger in. Think baby bath temperature. Too cold and your dough will take forever to rise. Too hot and you’ll kill the yeast before it even gets started. I usually just run my tap until it feels right, and that works nine times out of ten.

4) How to Make Sandwich Bread
Step 1
Grab your biggest mixing bowl and toss in the flour, salt, and yeast. Give it a quick stir with your hand or a spoon just to distribute everything evenly. This takes like ten seconds. I’ve forgotten this step before and ended up with pockets of salt in my bread, which wasn’t great. So yeah, mix those dry ingredients first.
Step 2
Pour your warm water right over the dry ingredients. Now comes the fun part. Use a wooden spoon, a dough whisk, or just your hands to mix everything together. You’re going for a shaggy, sticky mess that barely holds together. It won’t look pretty, and that’s perfect. If it seems way too wet and soupy, add a tablespoon or two more flour. If it’s super dry and crumbly, splash in a bit more water. The dough should be sticky enough that you wouldn’t want to knead it, which is great since we’re not kneading it anyway.
Step 3
Cover your bowl with a clean kitchen towel or some plastic wrap. I like spraying my plastic wrap with cooking spray so it doesn’t stick to the dough when it rises. Now just walk away. Let it sit on your counter for anywhere from two hours to overnight. The longer you let it go, the better the flavor gets. I usually mix mine up after dinner and let it sit overnight. By morning, it’s doubled in size and smells amazing. If you’re in a rush, two hours works, but try the overnight method at least once. You’ll taste the difference.
Step 4
When your dough looks puffy and bubbly, it’s time to shape. Wet your hands with water so the dough doesn’t stick to you. Turn it out onto a lightly floured surface. Here’s the key thing I wish someone had told me the first time I made this bread. Don’t punch it down. Don’t knead it. Don’t mess with it too much. Just gently fold the edges toward the center a few times until it roughly forms a ball. Tuck the ends underneath to make it look neat. You can make one big loaf or divide it into two smaller ones. I usually go with one big loaf for dramatic effect.
Step 5
Set your shaped dough on a piece of parchment paper. Sprinkle a little flour on top and grab your sharpest knife. Score one to four lines across the surface. This isn’t just for looks, though it does make your bread look super professional. The cuts let steam escape and give the bread room to expand. Let your shaped loaf rest for 20 to 30 minutes while you preheat the oven. This rest period lets the gluten relax and gives you a better oven spring later.
Step 6
Crank your oven to 450 degrees and put your baking vessel inside to heat up. I use a Dutch oven most of the time, but a pizza stone, baking stone, or cast iron skillet all work great. The key is getting whatever you’re using really, really hot. This high heat is what gives you that incredible crust. Wait until your oven fully preheats and then give it an extra five minutes just to make sure everything’s screaming hot.
Step 7
Carefully slide your dough, still on the parchment paper, onto that hot surface. If you want an extra crispy, crackly crust, pour about a cup of hot water into a small pan on the bottom rack or toss in five ice cubes. Shut the oven door fast to trap all that steam. This steam is what creates that bakery style crust. The first time I did this, I was shocked at how much of a difference it made. Now I never skip this step.
Step 8
Bake for 25 to 30 minutes. You’re looking for a deep golden brown color all over the top and sides. The crust should look thick and crispy. If you tap the bottom of the loaf, it should sound hollow. That hollow sound means it’s done. I’ve pulled loaves out too early before, and the inside was still a bit gummy. Give it the full time.
Step 9
Take your bread out and immediately transfer it to a wire cooling rack. I know it smells incredible and you want to cut into it right away. I get it. But let it cool for at least 30 minutes before slicing. The inside is still cooking a bit as it cools, and if you cut too early, you’ll end up with a gummy texture. I’ve learned this lesson the hard way multiple times. The wait is worth it, I promise.
Step 10
Once it’s cool, store your bread in a paper bag or wrap it loosely in a kitchen towel. This keeps the crust crispy instead of turning soft and chewy. Plastic bags make the crust soft, which is fine if that’s what you like, but I prefer keeping that crackly exterior. A paper bag on the counter works perfectly for a couple days.
5) Tips for Making Sandwich Bread
Let me share some things I’ve figured out after making this bread way too many times. The water temperature really matters. I killed my first batch of yeast by using water that was too hot. Now I test it with my finger, and if it feels warmer than my body temperature but not hot, it’s perfect. Room temperature water works too, but your rise time will be longer. Cold water straight from the fridge will take forever.
The rise time is flexible, which is one of my favorite things about this recipe. I’ve let dough rise for as little as two hours when I was impatient, and it still turned out good. But when I let it go eight to ten hours overnight, the flavor is noticeably better. You get this subtle tang that makes the bread taste complex and interesting. If you can plan ahead, go for the longer rise. Your taste buds will thank you.
Don’t be scared of the sticky dough. My first instinct was to add more flour until I could handle it easily, and that made my bread dense and heavy. The stickiness is actually what you want. It creates that open, airy crumb with all those beautiful holes. Wet your hands when handling the dough, and you’ll be fine. It feels weird at first but you get used to it fast.
The steam step makes a huge difference in crust quality. I skipped it once when I was in a hurry, and my bread came out with a softer, less impressive crust. Taking the extra ten seconds to add water or ice cubes to the oven transforms the bread from good to amazing. Just be careful when you open that oven door. That steam is hot and comes rushing out fast.
Scoring the dough isn’t just decorative. Those cuts guide where the bread expands as it bakes. Without them, your bread might split in random places and look a bit wonky. Use your sharpest knife or a razor blade and make quick, confident cuts about half an inch deep. Don’t saw back and forth. Just one smooth slash per cut.
6) Making Sandwich Bread Ahead of Time
This bread is perfect for making ahead, which is one of the main reasons it’s become my go to recipe. I mix the dough after dinner, let it rise overnight on the counter, and bake it fresh in the morning. Walking into a kitchen that smells like baking bread is a pretty great way to start the day. If you want to plan even further ahead, you can refrigerate the dough after the initial rise.
Here’s how the cold fermentation works. After your dough has risen for a couple hours at room temperature, cover it tightly and stick it in the fridge. It’ll keep for up to three days. The cold slows down the yeast, and the longer fermentation develops even more flavor. When you’re ready to bake, pull the dough out, let it come to room temperature for about an hour, then shape and bake as usual. The flavor from cold fermented dough is incredible.
You can freeze the shaped dough too. After shaping your loaf, wrap it really well in plastic wrap and then foil. Freeze it for up to three months. When you want fresh bread, take it out the night before, let it thaw and rise overnight in the fridge, then bring it to room temperature and bake. This method is clutch when you know you’ve got a busy week coming up but still want homemade bread.
Already baked bread freezes great too. Let it cool completely, slice it if you want, and wrap it in foil or put it in a freezer bag. Frozen bread lasts for months. Pop slices straight in the toaster from frozen, or thaw the whole loaf on the counter for a few hours. You lose a tiny bit of that fresh baked magic, but it’s still way better than store bought bread.
7) Storing Leftover Sandwich Bread
Storing this bread properly makes a big difference in how long it stays good. I learned this after ruining a few loaves by wrapping them in plastic too soon. Let your bread cool completely before you store it. If there’s any warmth left, condensation will form inside whatever you wrap it in, and your beautiful crispy crust will turn soft and soggy.
A paper bag is my favorite storage method for keeping the crust crispy. Just slide the cooled loaf into a paper bag and leave it on your counter. It’ll stay good for about two days this way. The crust stays crackly, and the inside stays soft. After two days, the bread starts getting stale, but you can still toast it or use it for croutons or breadcrumbs.
If you prefer softer crust, go ahead and use a plastic bag. The crust will soften up within a few hours, which some people actually prefer for sandwiches. It won’t be as dramatic and artisan looking, but it’s easier to bite through. No judgment either way. I switch between methods depending on what I’m planning to use the bread for.
Bread boxes work great if you have one. They let just enough air circulate to keep the crust from getting too soft while protecting the bread from drying out too fast. I picked up a cheap bread box at a thrift store, and it’s become one of my most used kitchen items. If you bake bread regularly, it’s worth having one.
When your bread starts getting stale, don’t throw it away. Stale bread is perfect for making croutons, bread pudding, French toast, or panzanella salad. I actually let bread get a bit stale on purpose sometimes just so I can make croutons. Cube it up, toss it with olive oil and garlic, bake until crispy, and thank me later. Those croutons are better than anything you can buy.
8) Try these Bread next!


9) Sandwich Bread Recipe

Easy Sandwich Bread Recipe (No Knead!)
Ingredients
- 3 cups (395 grams) all purpose flour or bread flour
- ½ tablespoon kosher salt
- ¼ ounce instant or active dry yeast packet (or 2 ¼ teaspoons)
- 1 ½ cups warm water (105°F)
Instructions
- In a large bowl, toss together the flour, salt, and yeast. Give it a quick stir to combine everything evenly.
- Pour the warm water right over those dry ingredients and start mixing. I usually grab a wooden spoon or just use my hands. Mix until everything comes together into a shaggy, sticky dough. If it feels way too wet and won’t hold together at all, sprinkle in a tiny bit more flour.
- Cover your bowl with a clean kitchen towel or some plastic wrap (I like to spray the plastic wrap with a little cooking spray so it doesn’t stick). Now comes the easy part: just let it sit on your counter for anywhere from 2 to 10 hours. For the deepest flavor, I let mine go overnight.
- When you’re ready to shape, wet your hands with water (this keeps the dough from sticking to you) and gently turn it out onto a lightly floured surface. Don’t punch it down or knead it. Just fold the edges toward the center a few times to create a round shape. You can make one big loaf or split it into two smaller ones. Tuck the ends underneath so it looks neat.
- Set your shaped dough on a piece of parchment paper. Dust the top with a light sprinkle of flour and use a sharp knife to score 1 to 4 lines across the surface. Let it rest for about 20 to 30 minutes while you heat the oven.
- Crank your oven up to 450°F and put your baking vessel inside to get screaming hot. I use a Dutch oven, but a pizza stone, cast iron skillet, or baking stone all work great.
- When everything’s hot and ready, carefully slide your dough (still on the parchment) onto that hot surface. If you want an extra crispy crust, pour about 1 cup of hot water into a small pan on the bottom oven rack or toss in 5 ice cubes. Shut that door fast to trap all the steam.
- Bake for 25 to 30 minutes. You’re looking for a deep golden brown color and a crust that looks crispy and gorgeous.
- Take it out and let it cool on a wire rack for at least 30 minutes before you slice into it. I know it’s tempting to cut right away, but the inside is still cooking a bit as it cools.
- Store your bread in a paper bag or wrapped loosely in a kitchen towel. This keeps the crust nice and crispy instead of getting soft and chewy.
10) Nutrition
Serving Size: 1 slice, Calories: 120, Sugar: 0.1 g, Sodium: 200 mg, Fat: 0.5 g, Saturated Fat: 0.1 g, Carbohydrates: 25 g, Fiber: 1 g, Protein: 4 g, Cholesterol: 0 mg


Leave a Comment