
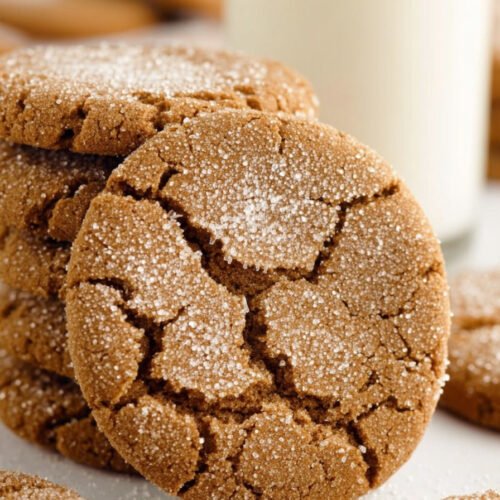
I never thought I’d be the person raving about gingerbread cookies. My mom used to make those hard gingersnaps every December, and honestly? Not a fan. Then last winter, I stumbled across this recipe for soft gingerbread cookies and everything changed. These aren’t your typical crunchy gingerbread man cookies. They’re pillowy soft, packed with warm spices, and they stay chewy for days. When my neighbor stopped by for coffee and tried one, she literally asked if I’d bought them from a bakery. True story. The gingerbread dough recipe comes together fast, no fancy equipment needed. Just mix, scoop, bake. What makes these the best gingerbread cookie recipe? The texture. Perfectly soft centers with slightly crisp edges. And unlike those cookies and cream cookies recipe disasters I’ve attempted, these turn out right every time. If you’re searching for an m and m cookies recipe, bookmark that for later. Right now, we’re talking spice, molasses, and pure holiday magic in cookie form.
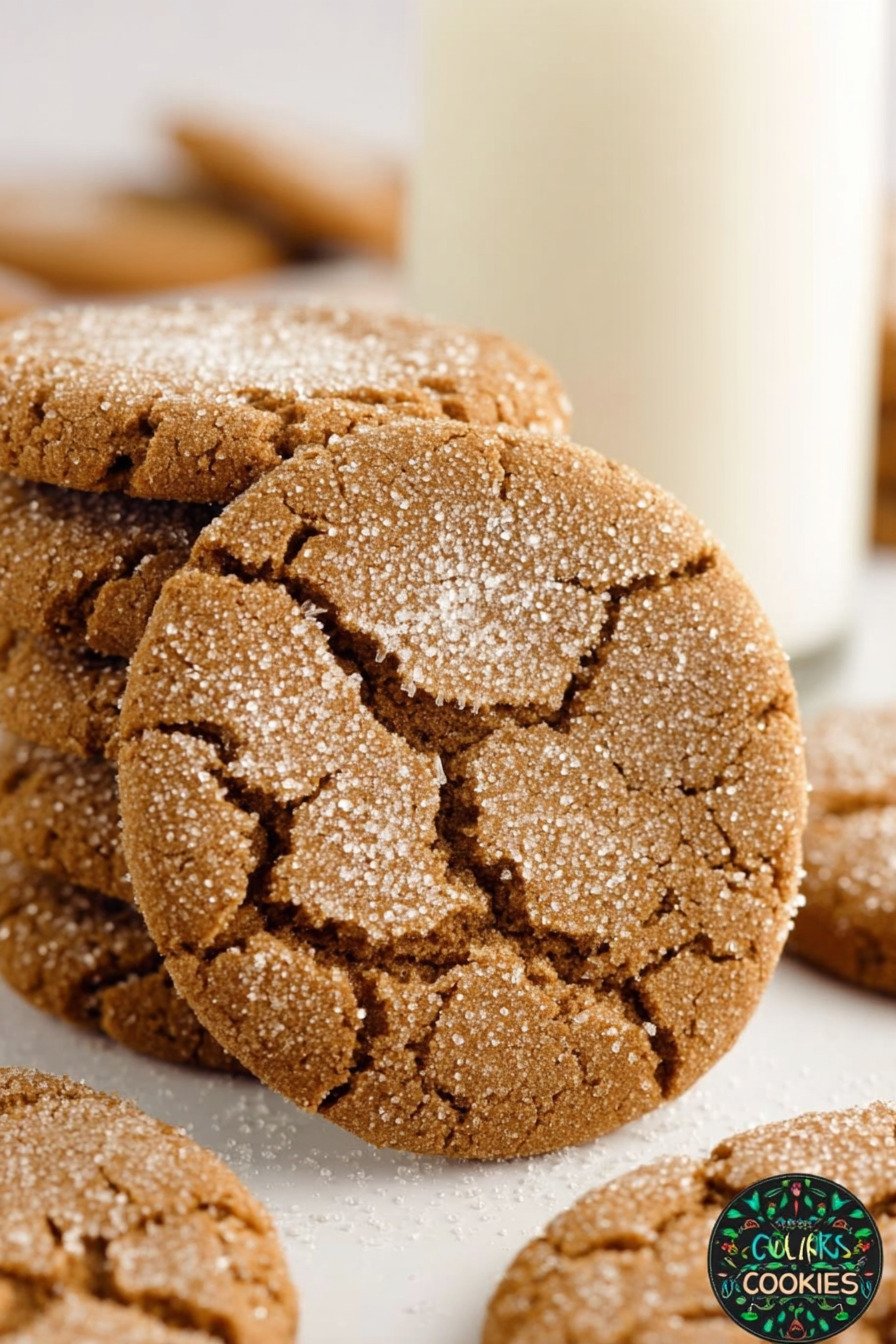
Table of Contents
- 1) Key Takeaways
- 2) Easy Soft Gingerbread Cookies Recipe
- 3) Ingredients for Soft Gingerbread Cookies
- 4) How to Make Soft Gingerbread Cookies
- 5) Tips for Making Soft Gingerbread Cookies
- 6) Making Soft Gingerbread Cookies Ahead of Time
- 7) Storing Leftover Soft Gingerbread Cookies
- 8) Try these Cookies next!
- 9) Soft Gingerbread Cookies
- 10) Nutrition
1) Key Takeaways
- What makes gingerbread cookies stay soft instead of crunchy?
- Can you make gingerbread cookie dough ahead of time?
- What’s the secret to perfectly chewy gingerbread cookies?
- How do you keep gingerbread cookies from getting hard after baking?
2) Easy Soft Gingerbread Cookies Recipe
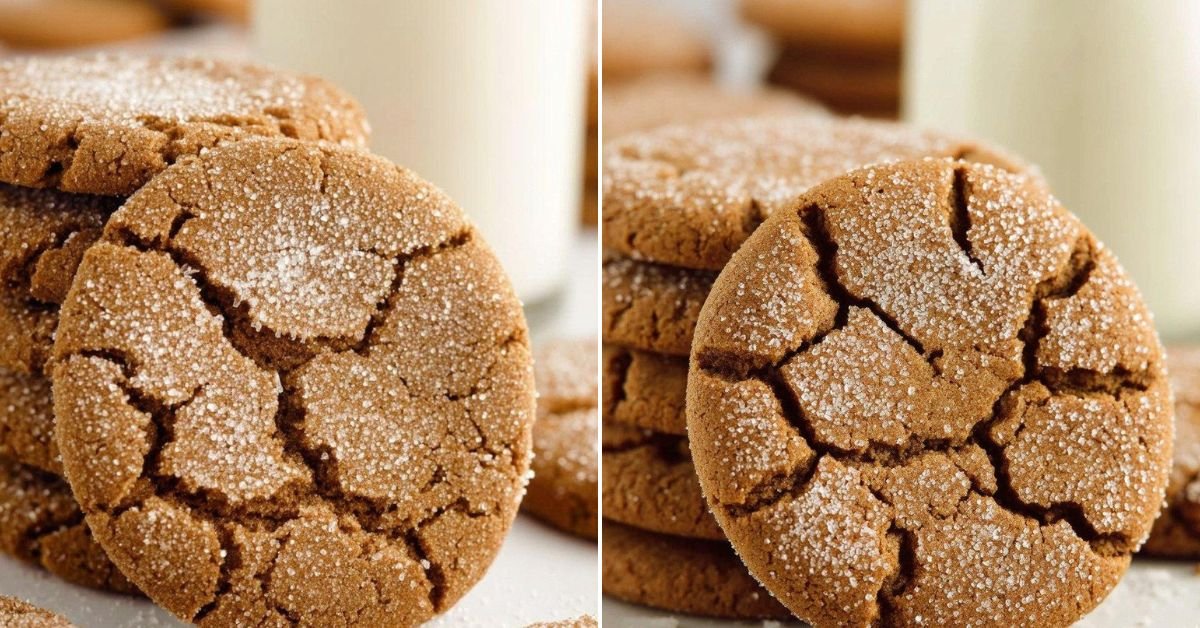
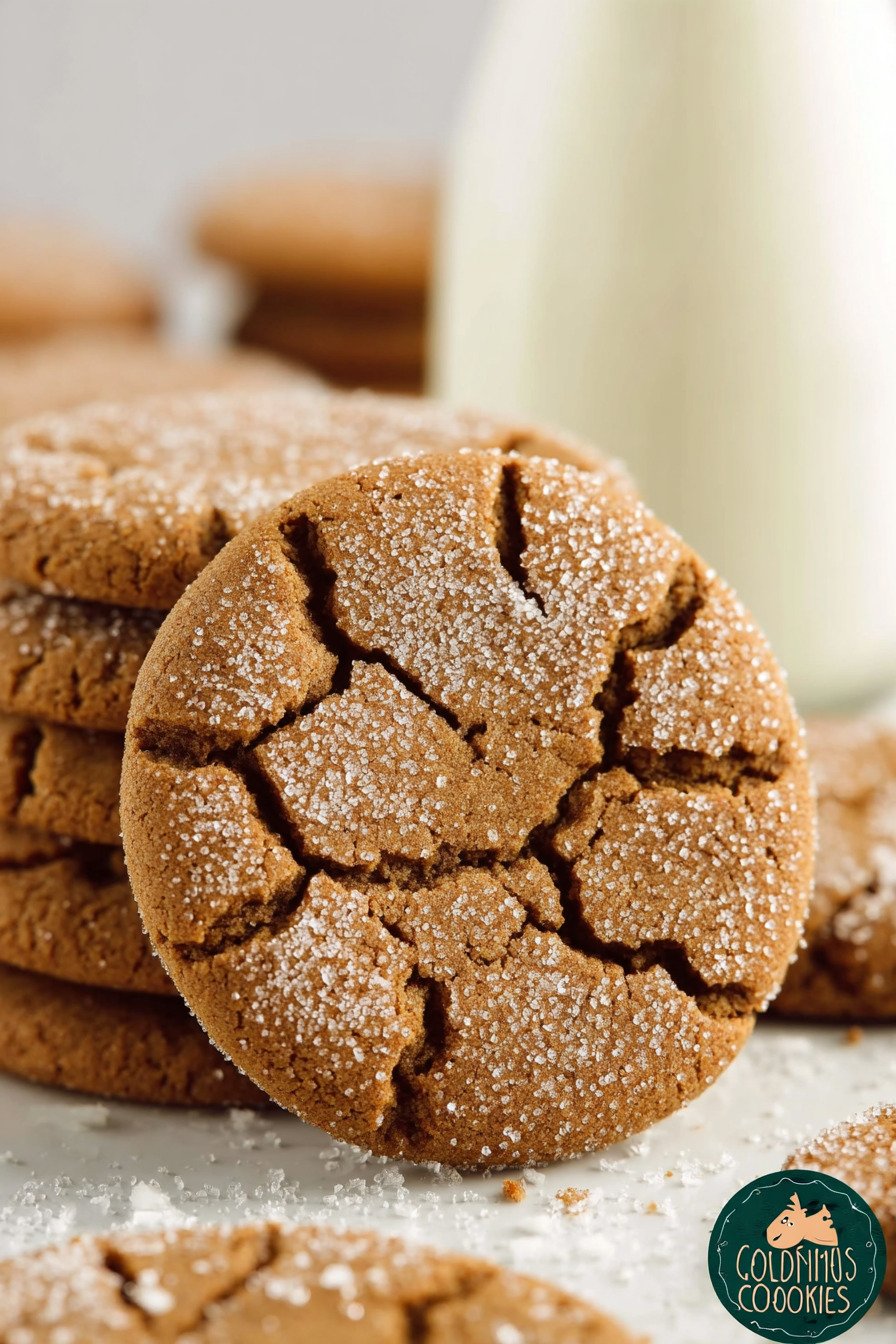
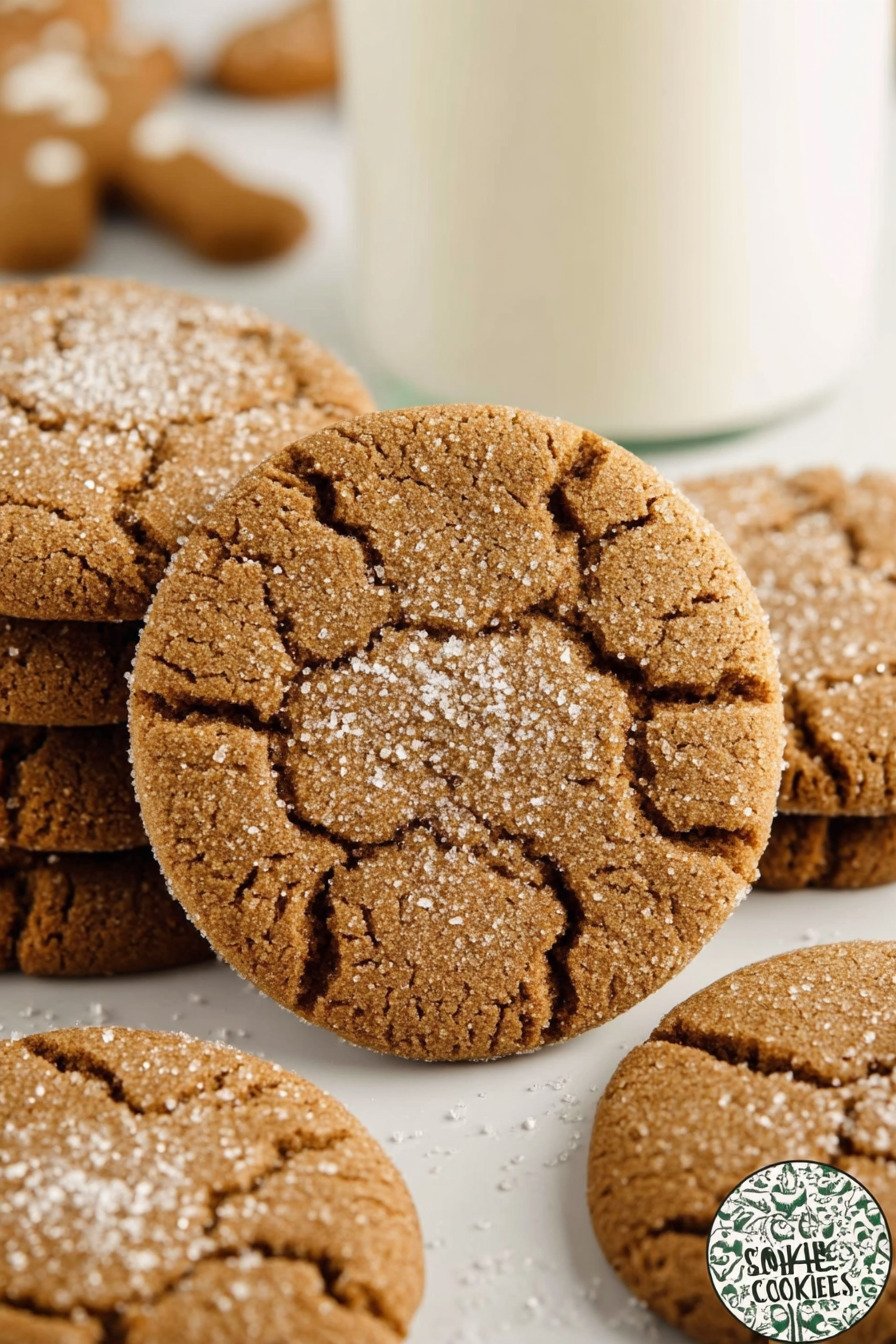
Listen, I get it. You’re probably thinking gingerbread cookies are those rock hard things your grandma used to make that could double as hockey pucks. I used to think the same thing until I tried making soft gingerbread cookies at home. Game changer doesn’t even begin to cover it. These gingerbread cookies are the complete opposite of what you’re imagining.
The texture is what gets people every single time. We’re talking pillowy soft centers with just the tiniest bit of chew around the edges. My sister took one bite and asked if I’d ordered them from some fancy bakery. Nope, just my regular old kitchen and about 20 minutes of actual work. The rest is just waiting for the oven to do its thing.
What I love most about this recipe is how forgiving it is. You don’t need any special equipment or ingredients you’ve never heard of. No stand mixer required. Just two bowls, a spoon, and your hands. I’ve made these cookies on chaotic weeknight evenings when my kitchen looked like a disaster zone, and they still turned out perfect. The gingerbread dough recipe is really that simple.
The smell alone is worth making these. When they’re baking, your whole house fills up with this warm, spicy scent that screams holidays. My neighbor texted me once asking if I was having a party because the smell was drifting through her kitchen window. True story. It’s that good.
Here’s what makes these cookies so ridiculously easy. You mix your dry stuff in one bowl. Cream your wet stuff in another. Combine them. Roll into balls. Dip in sugar. Flatten slightly. Bake for exactly 10 minutes. Done. No chilling the dough for hours. No rolling and cutting shapes. No decorating unless you want to. Just straightforward, delicious cookies that taste like you spent all day in the kitchen.
I’ve brought these to holiday parties, bake sales, and teacher appreciation events. They disappear faster than any other cookie I make. Last Christmas, I made a triple batch thinking I’d have extras to freeze. They were gone in two days. My kids kept sneaking them, my husband ate them with his morning coffee, and I may have stress-eaten a few myself during a Netflix binge.
The best part? They stay soft for days. Like, actually soft. Not that fake soft where you have to eat them within 12 hours or they turn into cardboard. These cookies maintain their texture beautifully, which makes them perfect for gift giving or making ahead for gatherings. Store them in an airtight container, and they’ll still taste fresh three days later.

3) Ingredients for Soft Gingerbread Cookies
Flour gives these cookies their structure and that tender, cake like crumb we’re going for. I use regular all purpose flour, nothing fancy. You don’t need bread flour or cake flour or any specialty stuff. Just the basic white flour sitting in your pantry right now. It creates the perfect base that holds all those warm spices without getting dense or heavy.
Salt might seem like a minor player, but trust me on this one. It balances out all the sweetness from the sugar and molasses. Without it, these cookies would taste flat and one dimensional. Just half a teaspoon does the trick. It brings out all those complex flavors and makes everything taste more like itself, if that makes sense.
Baking soda is what gives these cookies their lift and that slightly puffy texture. It reacts with the molasses to create those soft, tender centers we’re after. Don’t skip it or substitute baking powder. They’re not interchangeable here, and you need that specific reaction baking soda provides.
Cinnamon adds warmth and that familiar holiday flavor everyone loves. I use regular ground cinnamon from the grocery store. Nothing fancy needed. It pairs so well with the molasses and ginger, creating layers of flavor that make these cookies taste complex even though the ingredient list is simple.
Ground cloves bring that bold, festive punch that makes these taste unmistakably like the holidays. A little goes a long way with cloves, so we only use half a teaspoon. Any more and they’d overpower everything else. But that small amount? Perfection. It’s what makes people stop and ask what’s in these cookies.
Ginger is where the magic happens. This is what gives gingerbread its name and its signature warmth. Half a teaspoon provides just the right amount of spicy kick without making your mouth burn. If you’re a ginger fanatic like my dad, you can bump it up to a full teaspoon. I’ve tried it both ways, and both are delicious.
Shortening is the secret to keeping these cookies soft and chewy instead of crisp and crunchy. I know some people want to use butter, and I get it. Butter tastes amazing. But for this specific texture, shortening is the way to go. It keeps the cookies from spreading too much and maintains that tender crumb for days.
Sugar sweetens the dough and balances that deep, slightly bitter molasses flavor. You’ll need one cup for the dough itself, plus about a quarter cup extra for rolling the cookie balls in before baking. That sugar coating creates a subtle sparkle and adds a tiny bit of texture contrast to the soft centers.
Egg binds everything together and adds moisture. Just one large egg does the trick. It helps create that bakery style texture we’re after. Room temperature egg works best, but if you forget to take it out of the fridge early, just put it in a bowl of warm water for five minutes.
Molasses is the star ingredient that gives these cookies their dark color and rich, complex flavor. Use regular cooking molasses or full flavor molasses. Do not use blackstrap unless you want super intense, almost bitter cookies. I learned this the hard way. Stick with the lighter stuff, and you’ll be golden. The molasses is what makes these taste like real gingerbread cookies instead of just spiced sugar cookies.
4) How to Make Soft Gingerbread Cookies
Step 1. Grab your mixing bowl and throw in the flour, salt, baking soda, cinnamon, cloves, and ginger. Give everything a good stir with a whisk or fork to get all the spices distributed evenly throughout the flour. You want every bite to have that perfect balance of flavors. Set this bowl aside while you work on the wet ingredients.
Step 2. In a separate bigger bowl, add your shortening, sugar, egg, and molasses. Now here’s where people usually rush things. Don’t. Beat this mixture with your electric mixer for a full two to three minutes. I know it seems long, but this step is what gives the cookies that smooth, consistent texture. The mixture should look light and well combined.
Step 3. Pour your dry ingredients into the wet ingredients. Mix everything together until you can’t see any more flour streaks. Don’t overmix here, just get it combined. The dough will be soft and slightly sticky, which is exactly what you want. If it seems too sticky to handle, pop it in the fridge for 10 minutes to firm up slightly.
Step 4. Use a cookie scoop or tablespoon to portion out balls of dough. I like using a cookie scoop because it keeps them all the same size, which means they bake evenly. Roll each portion between your palms to make smooth, round balls. This takes like 30 seconds per ball, so don’t stress about making them perfect.
Step 5. Put that extra quarter cup of sugar in a small bowl. Take each cookie ball and roll it around in the sugar until it’s coated on all sides. This creates that pretty sparkly exterior and adds a little textural interest. Some sugar will fall off when you flatten them, and that’s totally fine.
Step 6. Place your sugar coated balls on a cookie sheet. I line mine with parchment paper or a silicone mat to prevent sticking, but you can grease the pan if you prefer. Space them about two inches apart because they will spread a little bit. Now gently flatten each ball with your palm or the bottom of a glass. You’re not smashing them flat, just pressing them down to about half an inch thick.
Step 7. Pop those cookies into a preheated 350 degree oven and bake for exactly 10 minutes. Set a timer. This is where people usually mess up. The cookies will look slightly underdone when you pull them out. They might even look a little puffy and soft in the centers. That’s perfect. They’ll firm up as they cool. If you bake them until they look done, they’ll end up hard and crunchy instead of soft and chewy. Trust the process and pull them at 10 minutes.
5) Tips for Making Soft Gingerbread Cookies
The biggest mistake people make with these cookies is overbaking them. I know I said it before, but it’s worth repeating. Ten minutes is the magic number. Your cookies should still look soft and maybe even slightly shiny on top when you take them out. They’ll look underdone. You’ll think I’m crazy. But when they cool down on the pan, they’ll set up perfectly with soft, chewy centers and slightly crisp edges.
Room temperature ingredients make a difference. I usually forget to take my egg out ahead of time, so I just stick it in a bowl of warm water while I’m measuring everything else. Five minutes later, it’s ready to go. This helps everything blend together more smoothly and creates a more consistent dough texture. Cold eggs can cause the shortening to seize up and make lumpy dough.
Preheat your oven properly. I know it seems obvious, but I’ve rushed this step before and regretted it. A fully preheated oven means your cookies bake evenly from the moment they go in. If the oven’s still heating up, the bottoms can burn before the tops are done. Just give your oven a full 15 minutes to come to temperature before you start baking.
Use quality cookie sheets if you have them. Thin or dark pans tend to burn the bottoms before the centers are cooked through. I love using silicone baking mats on my regular pans. They prevent sticking and promote even browning without any burning. If you don’t have those, parchment paper works great too.
Let the cookies cool on the pan for at least five minutes before moving them. They’re super soft when they first come out of the oven, and if you try to transfer them right away, they’ll fall apart. Just leave them on the baking sheet and let them firm up a bit. Then you can move them to a cooling rack or plate.
If you want stronger ginger flavor, bump up the ground ginger to a full teaspoon. I’ve done this when making them for ginger lovers, and they turn out amazing. The extra quarter teaspoon gives you way more of that spicy warmth without overwhelming the other flavors. Some people can’t get enough ginger, and this small adjustment makes them super happy.
Store them properly from day one. Don’t just leave them sitting out on a plate. Get them into an airtight container as soon as they’re completely cool. This locks in that soft texture and keeps them from drying out. I’ve left cookies out overnight before, and by morning they’re already starting to get hard. Not worth the risk when an airtight container is sitting right there in your cabinet.
6) Making Soft Gingerbread Cookies Ahead of Time
These cookies are perfect for making ahead, which is huge during the busy holiday season. The dough itself can be made up to two days in advance. Just mix everything together, wrap the bowl tightly with plastic wrap, and stick it in the fridge. When you’re ready to bake, let the dough sit at room temperature for about 15 minutes to soften up slightly. Then scoop, roll, sugar coat, and bake as usual.
You can also freeze the dough for longer storage. Shape all your cookie balls, roll them in sugar, and place them on a baking sheet in the freezer. Once they’re frozen solid, transfer them to a freezer bag or container. They’ll keep for up to a month. When you want fresh cookies, just place the frozen balls on a baking sheet and bake them straight from the freezer. Add maybe one or two extra minutes to the baking time.
Baked cookies freeze beautifully too. Let them cool completely, then layer them in a freezer safe container with parchment paper between the layers. They’ll stay fresh for up to a month. Thaw them at room temperature for about 30 minutes before serving. They taste just as good as freshly baked ones. I always make extra batches during December and freeze half for last minute gift giving or unexpected guests.
If you’re planning to give these as gifts, bake them a day or two before you need them. They actually taste even better after sitting for a day. The flavors meld together and develop more complexity. Just make sure they’re stored in an airtight container so they stay soft and fresh. Nobody wants to receive hard, stale cookies as a gift.
For holiday parties, I usually bake these the morning of the event. That way they’re still relatively fresh, but I’m not scrambling to get them done at the last minute. The beauty of these gingerbread cookies is they don’t need any decorating or frosting, so you can literally pull them out of the oven, let them cool, pack them up, and go.
7) Storing Leftover Soft Gingerbread Cookies
Getting these cookies into an airtight container as soon as they’ve cooled is your number one priority if you want them to stay soft. I use those big plastic containers with snap on lids. Glass containers with rubber sealed lids work great too. Just make sure whatever you use actually seals properly. A loose lid means air gets in, and air means your cookies dry out.
Here’s a trick my mom taught me years ago. Put half a slice of white bread in the container with your cookies. The cookies will absorb moisture from the bread and stay incredibly soft for days. Replace the bread every couple days if you’re keeping the cookies around that long. It sounds weird, I know. But it works like magic. Your cookies won’t taste like bread at all, they’ll just stay perfectly soft and chewy.
At room temperature in an airtight container, these cookies will stay fresh and soft for about three to four days. Maybe five if you’re using the bread trick. After that, they start to lose their texture and can get a little dry around the edges. Not that they usually last that long in my house. Between my family and random people stopping by, these cookies have a habit of disappearing fast.
Don’t store these cookies in the fridge. I see people do this all the time, thinking it’ll keep them fresh longer. But refrigerators actually dry things out. Your cookies will get hard and lose that soft, chewy texture we worked so hard to create. Room temperature storage is the way to go for these particular cookies.
If you need to store them longer than a few days, freezing is your best option. Layer the cooled cookies in a freezer safe container with parchment or wax paper between each layer. They’ll keep for up to a month in the freezer. When you want to eat them, just take out however many you need and let them thaw at room temperature for about 30 minutes. They’ll taste just as good as the day you baked them.
For gift giving or transporting to parties, I pack these cookies in tins or boxes lined with parchment paper. Layer them carefully so they don’t stick together or break. If you’re stacking them, put a piece of parchment between each layer. They’re pretty sturdy cookies, but a little extra care never hurts when you’re giving them away or bringing them somewhere special.
8) Try these Cookies next!


9) Soft Gingerbread Cookies
Soft Gingerbread Cookies That’ll Make Your Kitchen Smell Like Christmas
Ingredients
- 2 cups flour
- ½ tsp. salt
- 2 tsp. baking soda
- ½ tsp. cinnamon
- ½ tsp. ground cloves
- ½ tsp. ginger
- ¾ cup shortening
- 1 cup sugar plus about 1/4 cup to roll the dough in before baking
- 1 egg
- ¼ cup molasses
Instructions
- Grab a mixing bowl and toss in the flour, salt, baking soda, cinnamon, cloves and ginger. Give it a quick stir and set it aside.
- In another bowl, cream together the shortening, 1 cup sugar, egg and molasses. Use an electric mixer and beat for about 2 minutes. You want it smooth and well combined.
- Pour the dry mixture into the wet mixture and mix until everything’s incorporated. Don’t overmix, just get it combined.
- Use a cookie scoop to portion out tablespoon sized balls. Roll them between your hands to make them smooth and round.
- Put the extra 1/4 cup sugar in a small bowl. Roll each cookie ball in the sugar, coating all sides.
- Place the sugar coated balls on a cookie sheet and lightly flatten each one with your palm (or use the bottom of a glass if that’s easier).
- Bake at 350° for exactly 10 minutes. They’ll look slightly underdone when you pull them out, but trust me, they’ll firm up as they cool. Don’t overbake or you’ll lose that soft texture.
10) Nutrition
Serving Size: 1 cookie, Calories: 140, Sugar: 11 g, Sodium: 157 mg, Fat: 7 g, Saturated Fat: 2 g, Carbohydrates: 19 g, Fiber: 0.4 g, Protein: 1 g, Cholesterol: 7 mg


Leave a Comment